Friday, July 31, 2015

Basics: HDR explained

High Dynamic Range is a technique that gives more dynamic range to your picture. Dynamic range can be explained as being the difference between the lightest light and the darkest dark you can capture in a picture. 

To create a HDR image, you take 3 or more pictures of your subject instead of one. All of them with different exposure. With those 3 images (or more) plus some image editing software, you can create your HDR image. If you ask me, HDR doesn't work for all subjects. It works best for subjects that are strong in texture.   

So how does it work? 

1. Shoot in the Auto Exposure Bracketing (AEB) function on your DSLR (-2,0,2). Ofcourse you can shoot by hand, but it's safer to use a tripod. I guess it goes without saying that you shoot in raw. 

2. Then it's a question of importing your pictures into Lightroom. Then select the pictures you want to use for your HDR picture.

3. Next up is blending your images. There's a number of different programs to get the job done. These 3 methods work best for me: 
a. Using the blending function in Lightroom CC
b. Using Photomatix Pro
c. Using Photoshop CC

Below you'll find some more details on working with these programs. Without a further explanation, I would just like to add HDR Efex Pro as a fine solution for your blending. Find your preferred method by trying out and seeing for yourself what's to your liking. 

a.  Using the funtion in Lightroom CC


Select your images:

Right mouse click  -  Menu: Photo/Photo/merge/HDR  -  CTRL + H :


Preview appears:

Click Merge:
A new .DNG file appears in your lightroom. You can edit this the way you'd normally do.

b. Using Photomatix Pro


Select the pictures:


Right mouse click / Export / Photomatix Pro. Then this pop-up appears. I normally use the underneath options.

Click on Export:
The picture is now in Photomatix Pro. There are several options to edit your picture or you can use a preset (and then edit it).

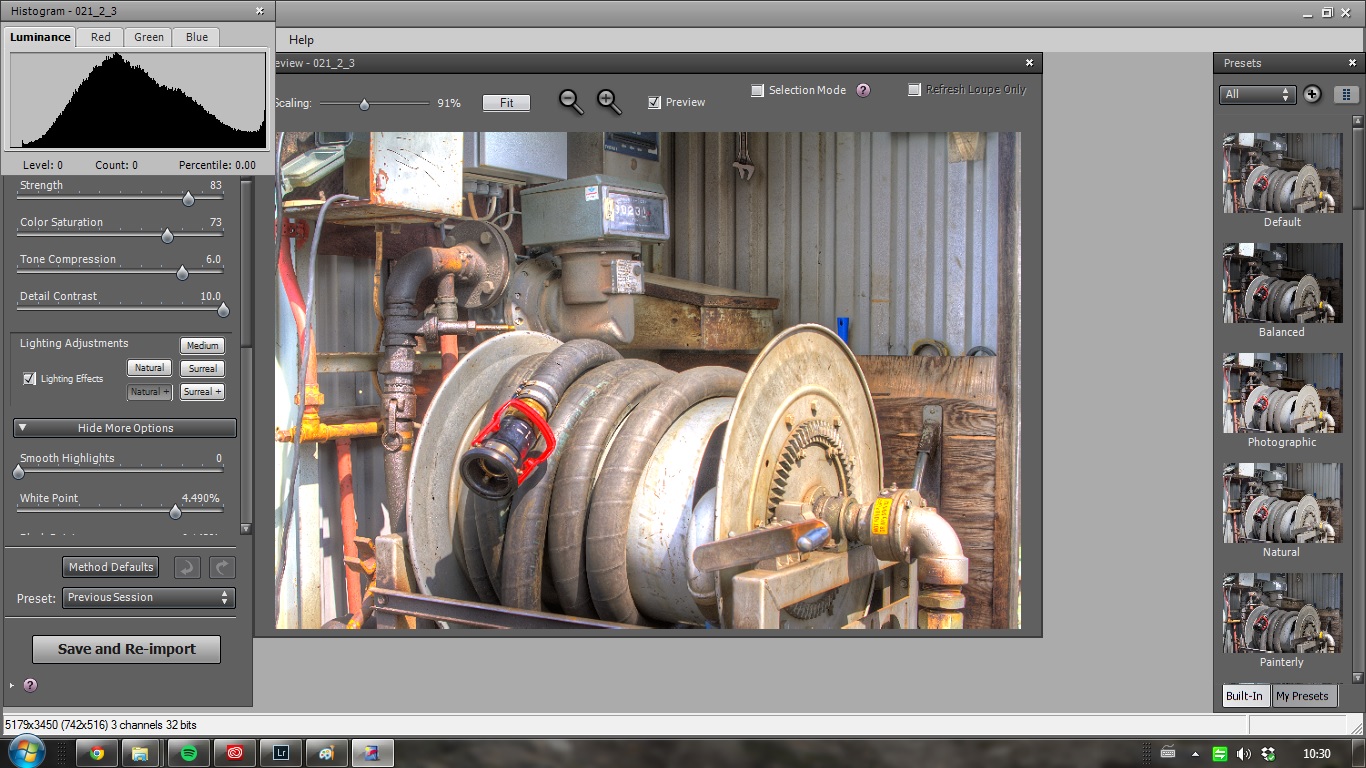
Click on Save and Re-import
The HDR picture now appears in Lightroom.

c. Using Photoshop CC

Select the pictures:


Right mouse click or the Menu: Edit in: Merge to HDR pro in Photoshop

Click on "Tone in ACR"

A new file will be created. Raw converter screen appears:

This is Camera Raw and works pretty much the same as Lightroom CC. It just has a bit of a different look and feel. So now you're ready to edit your picture with Camera Raw. When you're done, click on the OK Button. The pictures open in Photoshop. Save and close them. The newly created pictures will now appear in Lightroom.

So now you've got 3 HDR pictures in Lightroom.  Choose the one you like best. It's a matter of taste which one you like the most. If you ask me, HDR images shouldn't be like 'over the top'. There's so many HDR images out there where the colours seem 'overcooked' and where you see halos in the HDR image. It's not that difficult to correct your colours in Photoshop, wanna know how to do it? 

Right mouse click on the picture you want to edit: Edit in Photoshop

Choose Edit a copy


Click on icon Create new fill or new adjustment layer

Choose Hue/Saturation and a new pop-up appears

You can select a color and change it (to be more realistic) using the "hand"

Now when you're done with correcting the colours, save and close the picture. It will now be re-imported in Lightroom. Nearly there! Last step is to edit your picture in Lightroom one final time. I like to always dodge and burn, add grad filters and/or add a vignet. But like I said before: it's all a matter of taste. (and what your client wants ofcourse)

Here is my final image (based on the HDR I made with Photoshop CC).

If you want to learn more I highly recommend RC Conception. He really is an inspirational teacher where it comes to creating fantastic HDR art.


Wednesday, July 29, 2015

Tutorial / Long exposure: working with a ND filter

When I started working with my first ND (neutral density) filter, I really had to search for a good explanation on how to work long exposure shots with an ND filter. With this blogpost, it's my intent to give you a handy shortlist for shooting long exposure with your ND filter. 

Ofcourse it all starts with your trusty DSLR and your ND filter. An ND10 reduces the light with 10 stops. For your long exposure shot, you'll need a sturdy tripod. No matter how steady your hand is, you can never beat a good tripod. I prefer to work with a remote control, the Canon RS-80N3 is my preferred choice. 

Like with any good picture, it's most important to find a good location for your shoot. I prefer my pictures to be clean, without any unnecessary objects in it. I love going to our nearby Storsjön or to the fjäll with its lakes. But you can also find some really good spots for your long exposure picture with ND filter in the city. 

Now let's get on with it! 
1. Put your camera on the tripod;
2. Measure the light (aperture priority) with an F between 8 and 16;
3. Look in the table below (I always have the printout of this table in my bag) for the right exposure with the ND filter;
4. Use to autofocus to focus your image (or do this in manual);
5. Set your camera on Manual (bear in mind, you can't see a thing when your ND filter is attached);
6. Attach your ND filter;
7. Put some ducktape on your viewer (you don't want any light to come into you camera);
8. Make the picture (in the BULB setting), using the remote control;
9. Check the result;
10. Edit the picture in Lightroom or Photoshop. I'm a great fan of Serge Ramelli's work and I usually follow his basic workflow and add a bit of my own flavour. 

These are the basic steps to follow. But, like with any technique, the most important is to try it out for yourself. Try and see what goes well and where you might need a bit more patience or maybe adjust your settings. 

Besides keeping an eye on our blog, it's also great to watch this Scott Kelby vid. I love the way he explains it: a quick and clear explanation of how to shoot your long exposure shot with an ND filter. 

Right now, I'm using a SRB Photographic filter and I'm quite happy with it. Popular filters manufactures are B+W, Tiffen and Hoya. I heard and read about Leefilters, they're also a really good option if you're looking to buy good quality filters. 

The picture below I shot a couple of weeks ago. This is the Rödön Bridge in Jämtland, Sweden. This picture is on F8 and with a shutterspeed of 8 seconds. Right, now go out there and have fun shooting your long exposure shots! 


Monday, July 27, 2015

Tutorial / Workflow: this is where the magic happens....

Every so often it can happen that - when you shoot in RAW - you're a bit dissappointed when you see your pictures in Lightroom. On the back of your camera your pictures looked absolutely gorgeous with loads of colour, but it has all disappeared in Lightroom.  What happened??

Well, for starters, when you look at the little screen on the back of your camera, the presented image is in JPEG, with all the information. And in Lightroom, you get to see the RAW image with no information whatsoever.

For example, let's take this picture. When I took it, there was a fantastic sky with an abundance of colours. But Lightroom presents me with a boring dark picture.


So this is where the magic happens.....

Now it's your time to make your mark and to create your image. This is my basic workflow:
- Change white balance
- Add contrast
- Bring down the highlights
- Open up the shadows
- Work your whites and blacks
- Depending on the picture/subject add or remove vibrance/clarity
- Work on the lens correction

After the basic workflow, you can add a bit (more) of your personal taste, add some local corrections, like:
- Use graduated filter
- Work with brushes for colour (temp)
- Dodge and burn with brush or Radial filter.

And after all that, the initial picture has changed to this:


Ofcourse it's all a question of personal taste. I'm a big fan of colourful dramatic pictures. So you'll find me editing towards that. Don't be afraid to play around and make some changes. Get out there and find your own style.


Friday, July 24, 2015

Basics / sports photography: close, closer, closest....

When you're shooting sports, it's very important to crop your pictures to the bare essentials. Be there where the action is.

I took this shot during a rugby match, with I think it was my 400 mm. Pretty OK if you ask me.

But let's see what happens if you crop it a little closer.
Now we are there where the action is!  It gives the picture a totally other look and feel.  I even cropped it a little closer. 
Especially with ball sports it's very important to be as close as you can get. Bear in mind that getting as close as you can to the action, might tell you a whole different story than being further away. 

Let's take for example cycling. I took this shot sometime last year during the Dutch championships cycling (time trial).

And now come in a little closer on the action... 
The impact of the picture changes dramatically. It gives you more detail of the cyclist. It's best in sports like cycling and running to vary in how far you zoom or crop your picture.

The wider shots gives the viewer an indication of the enviroment. Especially when you shoot in a beautiful surrounding this can give beautiful pictures.  But what happens when we go closer.


One more example with a picture I took of Marianne Vos during the Dutch championships cyclocross.  
And again you get another look and feel. Each time the picture tells a different story. 
Take a look on the website Tim de Waele for more great cycling pictures.

There are a lot of opinions on how to crop. I usually take the easy way to crop in Lightroom and Photoshop. I just follow my instinct and crop what I like instead of following the official rules/rations. Ofcourse it's different when your client wants to have it in a specific ratio.


Just remember: have fun with shooting sports and get in on the action! 


Wednesday, July 22, 2015

Tutorial / Photoshop: patch tool

This post I want to talk about the content aware Patch tool in Photoshop. I think this is a pretty awesome tool. Let me show you why.

I took this picture a few years ago, during the Mudmasters event in Haarlem (Holland).
The guy in the yellow jacket is doing a great job. For the event. But not in my picture.

So I opened the picture in Lightroom for some quick editing.
After you've opened the picture in Lightroom, open the photo in Photoshop CC. With the Patch tool it is pretty easy to take the guy out of this picture.
Now is the time to select the guy in the yellow jacket. Hit enter. 

Find an area in the picture that fits. And hit enter again.  
Voila! The guy in the yellow jacket has disappeared from your picture!
I say, the result of this quick editing is not bad at all. It does need a little finetuning.
In this particular case I used the Clone Stamp Tool to remove the last parts of the yellow jacket.

And this is the end result. Not bad at all, I reckon!


Basics: the development of me + Photoshop + Lightroom

Back in the days, way back in 2010, I posted this picture on my Flickr account. At the time I was pretty pleased with it. One of my earlier attempts at HDR, I thought it turned out as a pretty cool picture.   
We're in 2015 now and looking back at this picture I now say it's a really boring and actually quite flat picture. So I took a few minutes to edite the picture again in Photoshop and Lightroom. What do you reckon, is it better than the one I posted back in 2010? 
I like this picture a lot more than the earlier version. Over the years, I've learned a lot from guys like Serge Ramelli, Scott Kellby and RC Concepcion. If you have a minute, do check them out, either on their websites or on Youtube. Or both. I continue to watch every update they post as they've already learned me so much! 


Tutorial / Lightroom: creating a panorama

One of the cool new features in Lightroom CC is that you can now create a panorama without having to use Photoshop. 
In previous versions of Lightroom you had to edit a picture in Lightroom and sync the rest of your pictures before you could export them to Photoshop to create a panorama. After saving it in Photoshop, you got it back as TIF file in Lightroom. 
But now you can create the panorama in Lightroom CC itself! And the best news is that you'll get it in RAW.

So, how does it work. 

Start with importing your pictures in Lightroom CC. Then select all the pictures that you need for the panorama and Right Mouse click -> select Photomerge > Panorama (shortcut: CTRL+M) or in the Photo menu. 

         
Lightroom CC now gives you a preview with several options

You can either use the default or try spherical, cylindrical or perspective. If you ask me, I think default is the best. There's the auto crop funtion, for cropping your picture. No one says you have to use it. You can always crop your picture later on in Photoshop or in Lightroom.


Now click on the Merge button. Lightroom CC gets underway to create your panorama. Depending on how fast your computer is, this might actually take a while. 
But when it's done, you’ve got new Raw (DNG file) in Lightroom CC. How awesome is that!

This is the moment to start your usual editing. Normally I do contrast, blacks and whites, Shadows and Highlight, Vibrance and Clarity, Remove Chromatic Abberation and  Enable profile corrections, Sharpness and Luminance.Check out the before and after pictures after a bit of simple editing. (backslash (\) in Lightroom)


Right. A few tips: 
1. Find a good location for a panorama.
2. Shoot in Manual, so all your pictures have the same settings.
3. Shoot in portrait mode.  Have enough space under and above your main subject.
4. In the ideal situation you should use a Tripod with  a panorama head.  But you can do it handheld. To be on the safe side, be sure to be extra generous with your overlap allowance, 30% every time is a good starting point.       
5. Avoid moving objects in your frame.
6. And remember to have fun!