Wednesday, December 30, 2015

Too cold to go out? Have fun shooting pictures indoors!

Even though winter has not started out as cold as usual in this neck of the woods, the weather can still put a bit of a dampener on things. 

Not to worry, there's still plenty to shoot indoors! Let's take for example splash photos. With splash photography the aim is to freeze the motion when the subject hits the water. The subject can be water or an other object that falls in the water.  


Setting up the shot:

  1. Put your camera on a tripod
  2. Use Flash (start with a 1/8 power)
  3. Background. Use a white or a coloured background. A coloured background gives the water a different color. Point the flash towards the background.
  4. A cable release can make the job just a little bit easier.
  5. A towel (or two) to clean up the mess.... 
Camera settings:
  1. Pre focus and put it on manual. 
  2. Set your camera in manual and use a low ISO, a shutterspeed of 200/250 and a aperture of around F8/F11.
And you're ready to go! Start shooting and see what works best for your setup. I know I always need quite a lot of pictures to get that couple of pics that are just right. I guess it's a bit trial and error. Just make sure your equipment is not getting soaked. 

When you've got the pictures you want, import them into Lightroom and go on the hunt for your best pictures: in focus and sharp. I hope you have fun trying this out! I know I did!

Don't forget to follow us on Facebook or 500px. And have you already discovered our brand new Facebook page Humans of the Nordic Region!


Monday, December 28, 2015

Uploading to Facebook? Here's the best way to save your pictures!

Uploading a picture to Facebook can be quite an annoying exercise. I know, I've been there. The quality of the image on Facebook is not half as good as it was in Photoshop. 

Rest assured! Something can be done about that!

Here's to go about it: start by using a width of your image that is 2048, 960 or 720. To check or change your image size go to Image > Image size


Second thing to check is if your image is in the RGB Color. Check or set in in RGB Color using Image > Mode >  RGB Color

After you've checked all that, save your file: go to File > Export > Save for web.  A new screen appears.

Choose JPEG on this screen and a quality of around 97. Be sure to tick the checkbox 'Convert to SRGB'. Check if the width of your file is correct and hit the save button.

There you have it! Now your image has the same awesome qualities on Facebook as it has in Photoshop! 

Don't forget to follow us on Facebook or 500px

And have you already discovered our brand new Facebook page Humans of the Nordic Region?


Friday, December 25, 2015

Another cool feature in the latest version of Photoshop CC, customize your toolbar

The latest version of Photoshop offers the possibility to customize your toolbar. Pretty cool if you ask me and it's easy to do: 

How to go about it: 

Go to Edit > Toolbar


Or click on the 3 dots in the toolbar:
  
A popup screen appears:

This is where you can customize the toolbar just the way you like it. Tools you never use can be hidden by dragging them to the right. 


And if you'd like to start all over again: you can always restore the default settings.

It's a nice feature that can help you to use the toolbar in Photoshop.

But I think the best and quickest way to use the toolbar is using and knowing your keyboard shortcuts. So if you want a brush hit the B on your keyboard of hit the E tool if you want to erase something.

Here is a handy picture from Phlearn with the shortcuts
Don't forget to follow us on Facebook or 500px.

And have you already discovered our brand new Facebook page 
Humans of the Nordic Region?

Wednesday, December 23, 2015

Creating a filmstrip in Photoshop

How cool is that, making your own filmstrip in Photoshop.

With creating your own filmstrip you get to learn a lot about the Free Transform Tool and Merging layers. And with a bit of warp and perspective thrown in, you get a great result!

Let's get started:
  1. Make a new file using CMD N  (Using Ctrl if you're using Windows). Make this layer black (edit > fill, choose black)
  2. Make a new layer and fill it with white
    Now you have a black and white layer
  3. Select the white layer and hit CMD T. Make the top and bottom around 75% and the left and hight about 90%
  4. Merge the two layers using CMD E
  5. Select all using CMD A, go to Edit > Copy
  6. Create or open a new file. This is the file where the filmstrip will be placed in. 
  7. Paste the first part of the filmstrip into the picture using CMD V
  8. Make a copy of the layer and move it next to the other layer
  9. Merge layer 1 and layer 1 copy using CMD E. Duplicate the new merged layer using CMD J. Move it next to the other layer. Next is merging the two layers again. And your basic filmstrip is ready. 
  10. The next step is to remove the white in the filmstrip. Select the white parts with the Magic Wand Tool (W) and hit delete. Hit CMD D to deselect the selection.
  11. Next is to create the holes at the top and bottom of the filmstrip. Hit E for the eraser tool and choose a square brush. Make one hole at the beginning, hold down the shift tool and make a hole at the end of the filmstrip. Now the upper part is ready. Do the same for the bottom part of the filmstrip. 
    Next step is to put pictures into the filmstrip. 


  12. Open a picture and copy it into the filmstrip. Scale it using CMD T. To get the picture behind the filmstrip, simply move the layer with the picture underneath the filmstrip layer.
  13. Add the other pictures into the filmstrip and scale them down.
    Next is to merge all layers. except the background layer. Select those layers and hit CMD E.
  14. There you have it! Your basic filmstrip with your own pictures is done!

    But it does look a bit flat, right? You want to give it a bit more dynamics by doing this: . Go to Edit > Transform > Warp and choose Flag
    A little less boring, right? 

    More depth can be created by using Edit > Transform > Perspective. Make the right side of the filmstrip smaller and the left side bigger.

    With CDM T and/or adding more perspective you can totally create the filmstrip the way you'd like to have it.
  15. One more thing though: to make it look real, it's a great idea to add some shadow. First make a new empty layer, grab a soft brush and make a black line 
  16. Using Perspective you can give the line the correct size
  17. Scale and move it using CMD T 
  18. Move the layer of the shadow under the filmstrip layer. Now the shadow is behind the filmstrip. If your shadow is too strong, reduce the Opacity of the layer. 
Voila! You've now created a really cool filmstrip in Photoshop.

Here's another filmstrip I made just the other day 


Don't forget to follow us on Facebook or 500px


And have you already discovered our brand new Facebook page Humans of the Nordic Region?


Sunday, December 20, 2015

Let it rain // tutorial on adding rain in Photoshop

With it being winter in this neck of the woods and with us longing for lots more snow, we posted a blog about adding snow just the other week. 

This blog though is about adding rain. As it might be handy to figure out how to do that too. 

Like in so many of our posts, we start with a picture from Pixabay.com

Now let's make it rain! 
  1. Add a black layer
  2. Fill this layer with black
  3. Convert the layer to a smart object
  4. Add noise:  Filter > Noise > Add Noise..  

  5. Add Motion Blur: Filter >  Blur Motion blur
  6. Change the blending mode to Screen
  7. Add Gaussian blur: Filter > Blur > Gaussian blur
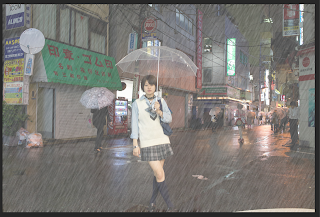
Voila! The girl is now standing in a regular downpour! 

In this picture I see some motion blur on the top and bottom of the picture. So I stretched this out with Free Transform (CMSD/CTRL T). Depending on your image you can add more contrast, use Blend and reduce the Opacity of the layer. Last thing you can do is to mask out some part where you don't want the rain.

And after I've done all that, this is the end result:


Don't forget to follow us on Facebook or 500px.

And have you already discovered our brand new Facebook page Humans of the Nordic Region?


Thursday, December 17, 2015

Going B/W in Photoshop using the Channel mixer adjustment

There's a ton of options to convert an image into B/W: use Lightroom or a plugin like Tonality pro. But:

You can also convert your images to B/W in Photoshop. There are quite a few options in Photoshop to do this. For example: y
ou can simply desaturate your image (Cmd/Ctrl U) or use a black and white adjustment layer.

But this blog is about the Channel Mixer adjustment. I love the way that this method gives you the possibility to add so much contrast to B/W images.

It all starts with opening Photoshop and selecting your image. This time we're using one of our own images:  

Before adding a new adjustment layer, I cropped the picture to a more landscape look and feel (horizontal). Thereafter I added a Channel mixer adjustment layer.
This will give you this panel: 

Turn on the checkbox Monochrome to turn the image B/W. I like to drag the Constant slider to the left to make the image dark(er) and then drag the red slider to the right to make parts of it brighter.

Ofcourse you also can drag the green and blue slider to see the effect on your image. The red has a lot of impact on the skin colors.

This adjustment layer is a good starting point for some more editing, if you feel you want to do more.
This is the result of my processing in Photoshop: 

And here's a step by step overview of what I did in postprocessing: 

Channel mixer 1: make the image black and white and give it a little more contrast
Channel mixer 2: make the top part of the image darker
Layer 1: add some gradient filters.
Layer 1: stamp visible layer: Added more contrast to the (wet) ground

Have fun experimenting with this! 

Don't forget to follow us on Facebook or 500px


And have you already discovered our brand new Facebook page Humans of the Nordic Region?

Tuesday, December 15, 2015

How to create a panorama in Photoshop

We've all been there I guess, where you cant to capture those awesome vistas in a panorama picture. Now we did write about panoramas in a previous post.

This blog though is about creating panoramas in Photoshop instead of in Lightroom. 

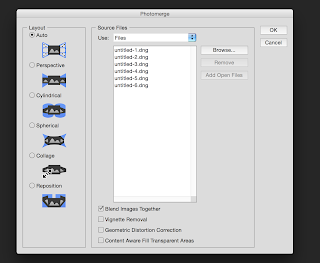
  1. Open Photoshop and choose File > Automate > Photomerge
  2. Choose your pictures for the panorama

    I went with the layout 'Auto' and then clicked on Ok. 

    Photoshop will now blend the images. The result is a panorama. In the layer panel you can see the images with a layer mask. You can now edit your picture. If you just want to flatten the images use CMD/Ctrl Shift E.)

Another way is to start in Lightroom: 
  1. Import all the images for your panorama into Lightroom

  2. Select all your images and right click and choose Edit in > Merge to Panorama in Photoshop  or in the menu Photo > Edit in .....

  3. So now you'll get the import dialogue in Photoshop. Choose Auto and click OK
Again we have an image with layers in Photoshop. You can edit in Photoshop now. I've cropped the picture in Photoshop.
 
I've flattened the image (Layer > Flatten image) and filled the transparant parts in the picture with the Content Aware Fill.

You can do this by selecting the transparant part with the Magic Wand Tool and choose Edit > Fill, choose content aware and check if the Content Awere Fill did its job.

Don't forget to save the image. The great thing with this method is that the panorama will be reimported into Lightroom. 

Now you get to select the image in Lightroom and do some more postprocessing if you like. 


Don't forget to follow us on Facebook or 500px

And have you already discovered our brand new Facebook page Humans of the Nordic Region?