Showing posts with label jämtland. Show all posts

Saturday, February 18, 2017

Textured Pop Art Photo Effect in Photoshop

Open an image in Photoshop

Convert it to a smart object

Then go to Image Adjustments Treshold
Drag the slider so that you see some details in your image

Add a new layer and make your background white.  I used the lasso and filled the selection(s) with white

Next step is to add color to the image. There are many ways to do that.  We use a Gradient Map adjustment layer. Choose the default Black to white gradient and change the colors like you want.


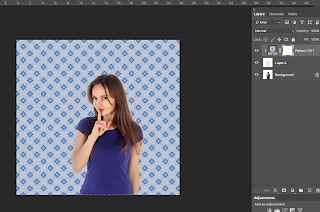
Now we gonna add a pattern to this image by adding a pattern fill layer.

Click Ok and choose a pattern.If you don't have a good pattern you can load a new pattern.  There are tons of patterns on the internet, for example on https://www.brusheezy.com.


Set your blending mode to multiply and if its too strong lower your opacity.

And here is the result.

You always can change things and add a for example a Hue and Saturation Adjustment Layer to change the color of your image.


Don't forget to follow us on Facebook or 500px. 

And have you already discovered our Facebook page Humans of the Nordic Region?


picture from  pixabay.com

Thursday, February 16, 2017

Lightroom Quicktip, brighten your image.

In this very short post we tell you a way to brighten your image.


To do this go to the develop model and increase the Shadows and Whites.  


If its still to dark increase the the exposure.  With some local adjustments like the radial filter we can brighten her face even more.


Try it out yourself.


Don't forget to follow us on Facebook or 500px.


And have you already discovered our Facebook page Humans of the Nordic Region?


picture from Pixabay.com


Monday, February 13, 2017

Define your own pattern in Photoshop

Its very easy to define your own pattern in Photoshop

Open an image which is the basics of your pattern


Use the Rectangle Marquee tool  to select the area of the pattern (feather must be 0 px).

Then go to Edit > Define pattern and give it a name. I named it Wall texture


To check if its in Photoshop got to Layer > New Fill layer > Pattern
Click ok ...  and you can see the pattern is there.


Don't forget to follow us on Facebook or 500px.


And have you already discovered our Facebook page Humans of the Nordic Region?


Monday, November 28, 2016

How to add a black border in Photoshop

This post is about quickly adding a black border round your picture.

1. Open your border 

2. Open the picture

3. Move your picture to the border using the move tool (V)
4. Select the image layer and use Cmd or Ctrl T to scale it, so it fits the border

5. Unlock the background layer and move it on top.

6. Change the blend mode of the border layer to Darken or Multiply. Voila! 

Don't forget to follow us on Facebook or 500px. 


And have you already discovered our Facebook page Humans of the Nordic Region?


Friday, October 7, 2016

How to create patterns for Photoshop with Adobe Capture

With the free Adobe Capture you can make patterns, shapes, colors, looks and brushes. In this blogpost I'm gonna show you how to create a pattern using Adobe Capture and use it as background for this photo:

So it starts with downloading the app. Then login with your Adobe Cloud ID. This must be the same ID that you're using for your Adobe Creative Cloud.

Choose patterns and make a 'picture' of something:

Now the fun begins, using the buttons under the picture. 

Look: you also can rotate your pattern.

I made these patterns of just a simple plant.

Now save your pattern to a new (or existing) Library. As soon as you saved it, it's syncing it with Photohop. So the patterns from your app are available in your library in Photoshop, sweet as!

Now you can use your pattern in Photoshop. By clicking on the pattern, you create a pattern fill adjustment layer

Use a different blend mode and use a mask to change the background of your image.

If you want a cleaner selection, first make a selection of the model and then add the pattern to the image and use a clipping mask.


If you turn your pattern into a Smart object you can easily change it with other patterns from your Library.


Here's a clip on how to do it: 

Don't forget to follow us on Facebook or 500px.

And have you already discovered ourFacebook page Humans of the Nordic Region?


Thursday, September 15, 2016

Double Exposure in Photoshop (part 1)

One of the great effects in Photoshop is the double exposure effect. And believe me: it's really not that hard to create an effect like this:

Basically it's nothing more then combining two pictures plus one layer mask.

In this clip they show you how to do it.

As with most other things: there are more possibilities for doing a double exposure. But it's all based on the two images and a layer mask.

Just try it out!

Don't forget to follow us on Facebook or 500px. 

And have you already discovered our Facebook page Humans of the Nordic Region?


Thursday, September 8, 2016

How to create a Jigsaw Puzzle Effect in Photoshop

You probably know by now that I love learning about Photoshop from other photographers. What's better than to learn from the experts themselves? There's so many great tutorials out there on the web and I try to select interesting ones to share them with you. 

Today I watched this clip and learned some new things.  

And ofcourse I had to give it a go myself! I find the trickiest part is to use the pentool. More on that in this clip from Phlearn


Here is our puzzle from Amsterdam

Don't forget to follow us on Facebook or 500px. 

And have you already discovered our Facebook page Humans of the Nordic Region?


picture from Amsterdam by pixabay.com

Monday, September 5, 2016

How to Make Caricature in Photoshop

After a fab summer we've just had a few autumnal days and what better to do than to brush up on your Photoshop skills. 

I really liked this clip from Photoshop Tutorials on editing an image into a caricature. 


And ofcourse I had a go at it myself. I started with this image: 

And transformed it into this caricature:


When you follow the steps in the video you learn how to use the liquify filter and how to use the warp tool. I had great fun figuring it all out, I hope you too!

Don't forget to follow us on Facebook or 500px.

And have you already discovered our Facebook page Humans of the Nordic Region?


picture from Pixabay.com

Tuesday, August 30, 2016

How to create your own cloud/smoke brush in Photoshop

In this blogpost we are going to show you how to create your own brush, using a picture with some clouds.

So this is how you do it: 
Open the image with the clouds. Select the cloud you want to use, using the Lasso tool (L)

Create a new document (Cmd N) 

Go back to the selection of the cloud and move or copy it into the new document

Now we are going to use the channels to extract the clouds from the background. If you don't see your channels go to Window > Channels.

Next: make a solid black colour layer underneath the clouds layer

Now find the channel that has the most contrast between the white and the background. Select this channel and drag it to the Make a new Channel icon.

Then go to Image adjustments levels.
Move the left slider to the right to remove the bright colour around the clouds

Then select the clouds: cmd and click on the channel thumbail to select the colours

Create a new layer and fill it with black 

With the selection still active go to Image > Crop.
Then go to Edit > Define brush preset and give your new preset a name and hit OK

Now we have got a brush and the great thing is: you can modify it. Hit the brush tool (B). 

Photoshop now opens the brush you just created. Click on the icon 

This is where you can change your brush exactly the way you like. 

Me, I started with the Size and Angle jigger under Shape Dynamics

Then I changed the Scatter under Scattering and the Opacity under Transfer. 

When done with adjusting your brush, you can then obviously use it on (all) your pictures. Always paint on a new layer and colourize the clouds with a Hue/Saturation Adjustment Layer (using a clipping mask). By reducing the opacity of the layer you can make the clouds a bit more subtle.

So, after having read all the theory, here's our before and after:  

Before:

After:


Don't forget to follow us on Facebook or 500px. 


And have you already discovered our Facebook page Humans of the Nordic Region?
    picture from Pixabay.com