But what exactly is a contact sheet? It is an arrangement of multiple, small, same size images on a single page. You might also give some information about the images such as the image filename placed under the image. The purpose is to provide reference to a larger number of images. You may print them to keep or give to a client as a catalog of the images from a shoot, for example.
Here's how to make such a contact sheet in Lightroom:
Go to Print Module in Lightroom. You can find the contact sheets in the Lightroom templates
You can choose which pictures you want to have on your contact sheet.
If you choose Selected Photos, don't forget that you must actually select the images in your filmstrip.
You can easily change your page setup.
Now that have selected the images for your contact sheet, you can modify the layout.
On the right panel you'll find a lot of different options:
1. Image settings
All settings speaks for themselves. Just try things out to see what works best for your contact sheet.
2. Layout
Here you can choose how many pictures you'd like to have contact sheet (rows and columns) and how much space you want between them. This is also where you choose the margins of your page.
3. Guides
Guides help you to design your contact sheet but will not be printed.
4. Pages
And there's some extra options:
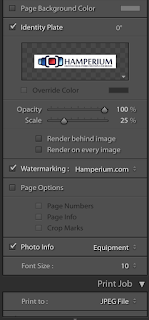
a. Background
You can change your background colour, but I have found that white works best most of the times.
b. Identity plate
This can be used to add your identity. I choose to use our logo.
c. Watermark
If you want to, you can add a watermark on all pictures in the contact sheet
Here you can put some extra information on your contact sheet, like for example page number.
e. Photo info
This is where you can add information (photo caption) to all the pictures in your contact sheet, like File name etc.
5. Print Job
This is where you can change your print settings.
Once you have selected the images and the layout, you can click on the print button and Lightroom will print the Contact Sheet. I love the option to print it as a .pdf file. That way it's really easy to mail it to a client.
If you want to save all the settings, so that you can use it for another contact sheet, just click on the + in the left panel. Give your template a name and location and save it.
That's all there is to it! Easy right?
Don't forget to follow us on Facebook or 500px.


No comments:
Post a Comment