Wednesday, May 25, 2016

How to install presets in Lightroom

This post is about how to install presets in Lightroom. Presets can be a great help when you edit a picture in Lightroom. It all starts with knowing how to install new presets. 

First of all, you have to download the free presets and unzip them. Then copy the folder with the presets. Now you can add them to Lightroom. Here's how to go about it:
  1. go to Lightroom > Preferences
  2. Then click on Show Lightroom preset folder in the Presets tab.
  3. Then go to Lightroom > Develop Presets, and paste the folder with the presets.
    In this case we added some presets from Serge Ramelli into Lightroom

  4. Now restart Lightroom and voila! The presets are ready to use.

Don't forget to follow us on Facebook or 500px.  

And have you already discovered our Facebookpage Humans of the Nordic Region?


Monday, May 23, 2016

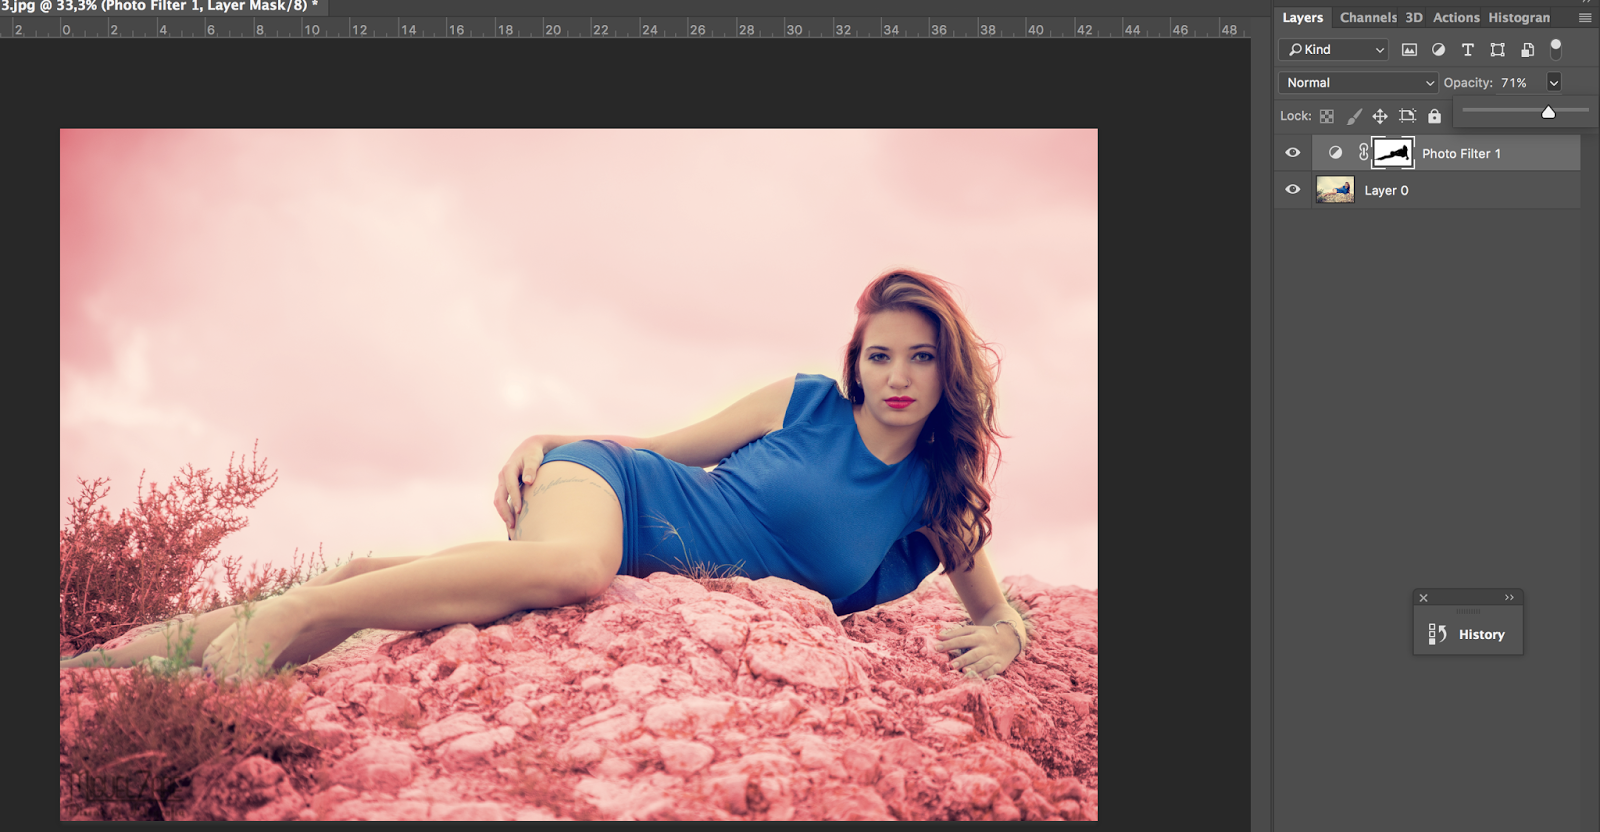
Using a photo filter in #Photoshop

A post about using the photo filter in Photoshop.  You can open a picture and give it another look and feel using a filter.  

Open the photo filter adjustment by clicking in the Layer in the menu:  Menu > New Adjustment layer > Photo filter...

Or in the adjustment Layers panel

There are many filers to choose from

With the density you can increase the effect.

Here some examples:


Or use your one color by using the color picker:
By using the mask you can decide where in your picture you want your photo filter effect and can reduce the opacity of the mask.


Try it out yourself !

Don't forget to follow us on Facebook or 500px. 


And have you already discovered our Facebook page Humans of the Nordic Region?

Picture from pixabay.com


Thursday, May 19, 2016

How to change a background of a portrait in Photoshop

Sometimes it can be so handy to be able to change the background in a portrait. Or any picture for that matter. But this post is about changing the background in portrait shots. 

Like with many other things in Photoshop, there is more than one way to do this. 

One is use a texture and move (V) it to this picture. Enlarge the texture so that it fits. Then you can mask out the part where you don't want the effect and use a blending mode like overlay.

You also can add a black layer mask and paint it in with a white brush where you want to have the effect. This is just one way to the job

Then, the second way of achieving this is to open the image of the portrait. Then make a selection with the quick selection tool (W) and refine the edges. Choose a layer with a layer mask as output. Then move the texture to the picture of the portait. Move the layer (V) under the layer with the layer mask.

You can make your background lighter or darker by selecting it and opening the levels (Cmd L)

Two relatively easy ways to change the background in your portrait images. 

Don't forget to follow us on Facebook or 500px. 


And have you already discovered our Facebook page Humans of the Nordic Region?


picture of pixabay.com

Wednesday, May 18, 2016

How to create a Contactsheet with #Photoshop

In a previous post we wrote about how to make a contact sheet in Lightroom. It'll probably come as no surprise that you can do this in Photoshop too! A contact sheet can be a powerful tool to present your work to for example a client. 

This is how it works:
Go to File > Automate >Contact Sheet II


A new pop screen appears
  • Select the photos from a folder of a file 
  • Choose the size of the document and the settings of the document

    The options 'flatten all layers' gives you the possibility to create one flat image or 1 image with each photo on his own layer. 
  • Choose the number of rows and columns. The option use auto spacing is something I turned off because in that case your pictures are very close together. If you ask me it's better to decide for yourself what the space between the pictures should be.

  • And you can choose the filename as a caption
When you are done click OK. 

Depending on the number of pictures and the number of rows and columns, Photoshop will create one of more Contactsheets.

The handy thing with having all on its own layer is that you can easily change the name of the files. 

In the end you can save the Contactsheet as a .Jpeg or, even better, as a PDF presentation
(File > Automate > PDF presentation)


The pdf is very easy and can be mailed to your client. There you have it, your very own contact sheet created with Photoshop!

Don't forget to follow us on Facebook or 500px. 


And have you already discovered our Facebook page Humans of the Nordic Region?


Sunday, May 15, 2016

How to install fonts in Photoshop on a Mac

How to add new fonts in Photoshop on a Mac? It's actually pretty simple, let me take you there. 

First of all download the (free) fonts for example the Cinzel font. Save the file on your computer. I'm using Chrome so it's in my downloads folder:

Unzip the file by double clicking on it. Now you have a folder with the fonts

Double click on the font and choose install fonts

Next is to restart Photoshop and there they are: your new fonts, easy right? 

Don't forget to follow us on Facebook or 500px. 


And have you already discovered our Facebook page Humans of the Nordic Region?


Thursday, May 12, 2016

Spinning around!

Not too long ago we were in Holland for a couple of days. Before we went, I drew up a list of photography goals and one of my goals was to shoot a long exposure shot of a mill. Unfortunately the weather was not what I had hoped for. 

Then again, that didn't withhold me from taking some pretty cool shots if I do say so myself. This is one of my favourites.

So how did I do this? 
It's actually pretty easy. First you need a windmill (dooh) and some wind so the windmill is actually spinning. The mill I shot had its sails turning quite slowly. 
I got out my gorilla pod and added an ND filter. With a shutter speed of 30 seconds at F20 I created this shot.

Once back home, I edited the picture in Lightroom. I followed my usual workflow. After that, I imported the picture into Tonality Pro (Macphun) and did some final editing. 

I guess it's a different image of a windmill than the usual Dutch windmill pictures. Do let me know what you think of it.

Don't forget to follow us on Facebook or 500px. 


And have you already discovered our Facebook page Humans of the Nordic Region?

Wednesday, May 11, 2016

How to create a panorama with #Photoshop CC

I'm still amazed at how much difference a few kilometers can make. With driving only about 5 Swedish miles north, the lakes are still frozen and the snow is still on the ground. Whereas in my home village, we're happy to have seen the last of the ice this winter and can't wait for the green grass to come out. 

Today I was in northern Jämtland and I made 3 images with my Samsung. The goal I had in mind was to make them into a panorama without using Lightroom. 

Let me tell you how I did it all only using Photoshop.

Open the 3 images with File > Automate > Photomerge

Click on browse and select your images

Select a layout.  

Click Content Aware Fill transporant Areas if you want Photoshop to try to fill in those areas

Click on OK.

Now Photoshop creates your panorama.

All that's left is to crop the image to your liking and/or to fill some areas and edit the image the way you like it.

Don't forget to follow us on Facebook or 500px.

And have you already discovered our Facebook page Humans of the Nordic Region?