In Photoshop its easy to colorise and black and white image. Here is how it works. First open an image
In this case I want to make the water a little blueish. So i add a Solid color Adjustment layer and choose a light blue color
Change its blending mode to Color.
Now the picture is completely blue. So fill mask with black and paint with a soft white brush over the water. Lower the Opacity of the layer and you get this.
You add more sold color adjustments layer and fill it with other colors to give other parts of your picture also some color.
Cool and simple ! And by double clicking on the solid color you can easily change the color.
Its easy to add a vignette in Photoshop and their are many ways to do it. In this short blog we show you way to do it using the Lens Correction Filter. Open a picture and duplicatie the layer
Convert the top layer to a Smart Object (Ctrl click on the layer)
Go to Filter > Lens Correction and click on Custom
You can see the vignette section in the middle of the screen. Drag the slider to the left to create a dark vignette. Drag it to the right to create a light vignette, but why should you do that.
Set the midpoint on a place that fits best with your photo.
Easy and quick
By double click on the lens correction in your layer panel you can change the amount.
In real life, it's not an easy feat. But with what I've learned from the guys from Phlearn.com, it's relatively easy to remove a tattoo using Photoshop! Check out this clip:
It shows you how to a remove a tattoo. This video shows you how to work with the
Spot Healing brush tool (J)
Using the brush tool and sample a color
Add skin texture
Working with layers and layer masks
Overlay blending mode in combination with a 50% Grey fill
With the free Adobe Capture you can make patterns, shapes, colors, looks and brushes. In this blogpost I'm gonna show you how to create a pattern using Adobe Capture and use it as background for this photo:
So it starts with downloading the app. Then login with your Adobe Cloud ID. This must be the same ID that you're using for your Adobe Creative Cloud.
Choose patterns and make a 'picture' of something:
Now the fun begins, using the buttons under the picture.
Look: you also can rotate your pattern.
I made these patterns of just a simple plant.
Now save your pattern to a new (or existing) Library. As soon as you saved it, it's syncing it with Photohop. So the patterns from your app are available in your library in Photoshop, sweet as!
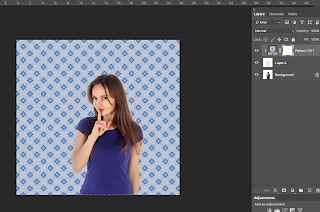
Now you can use your pattern in Photoshop. By clicking on the pattern, you create a pattern fill adjustment layer
Use a different blend mode and use a mask to change the background of your image.
If you want a cleaner selection, first make a selection of the model and then add the pattern to the image and use a clipping mask.
If you turn your pattern into a Smart object you can easily change it with other patterns from your Library.
You can tell a story with the colours in your picture. In a previous post we talked about complementary colours. This clip shows you a lot about colour grading and complementary colors.
Complementary colours are pairs of colours which, when combined, cancel each other out. This means that when combined, they produce a grey-scale colour like white or black. When placed next to each other, they create the strongest contrast for those particular two colours.
To see what the opposite colour is for, for example a skin tone, have a look at your colour wheel. Here you can find the colour wheel on the Adobe site. Watch the movie and play around with a picture and try to create another colour grade.
After a fab summer we've just had a few autumnal days and what better to do than to brush up on your Photoshop skills.
I really liked this clip from Photoshop Tutorialson editing an image into a caricature.
And ofcourse I had a go at it myself. I started with this image:
And transformed it into this caricature:
When you follow the steps in the video you learn how to use the liquify filter and how to use the warp tool. I had great fun figuring it all out, I hope you too!


 Now add a Hue and Saturation adjustment layer and clip it to the underneath layer. Click colorize and change the hair in the color you like.