Showing posts with label girl. Show all posts

Thursday, March 16, 2017

One way to color hair in Photoshop

In Photoshop their are several things to do something.  For example change the color of hair.

This is a very simple way.

Open your image

Add a new empty layer and paint with a soft brush over the hair. Be as accurate as you want.

Change the blending mode to soft light. Now you can see the hair of the woman is lighter.

Now add a Hue and Saturation adjustment layer and clip it to the underneath layer.  Click colorize and change the hair in the color you like.

Easy and fast way to change the color of someones hair.

Don't forget to follow us on Facebook or 500px. 

And have you already discovered our Facebook page Humans of the Nordic Region?


picture from pixabay.com


Thursday, February 16, 2017

Lightroom Quicktip, brighten your image.

In this very short post we tell you a way to brighten your image.


To do this go to the develop model and increase the Shadows and Whites.  


If its still to dark increase the the exposure.  With some local adjustments like the radial filter we can brighten her face even more.


Try it out yourself.


Don't forget to follow us on Facebook or 500px.


And have you already discovered our Facebook page Humans of the Nordic Region?


picture from Pixabay.com


Wednesday, April 20, 2016

How to put your subject in another background in Photoshop

In this post we're moving our subject and placing it against another background.

I start with 2 pictures:


The goal is to move the girl to the other background (image 1) and make it look realistic. First of all, I've got to cut out the girl from her original background. To do this, I open the picture and use the quick selection tool (W).

I used refine edges to improve the selection and went with output as Selection. I right clicked on the selection and chose 'Layer via cut'. Don't forget to make the background layer inactive here.  

Open the picture of the background. Select the girl and move her to the new background using the Move tool (V). I used the free transform tool (Cmd T) to scale it.

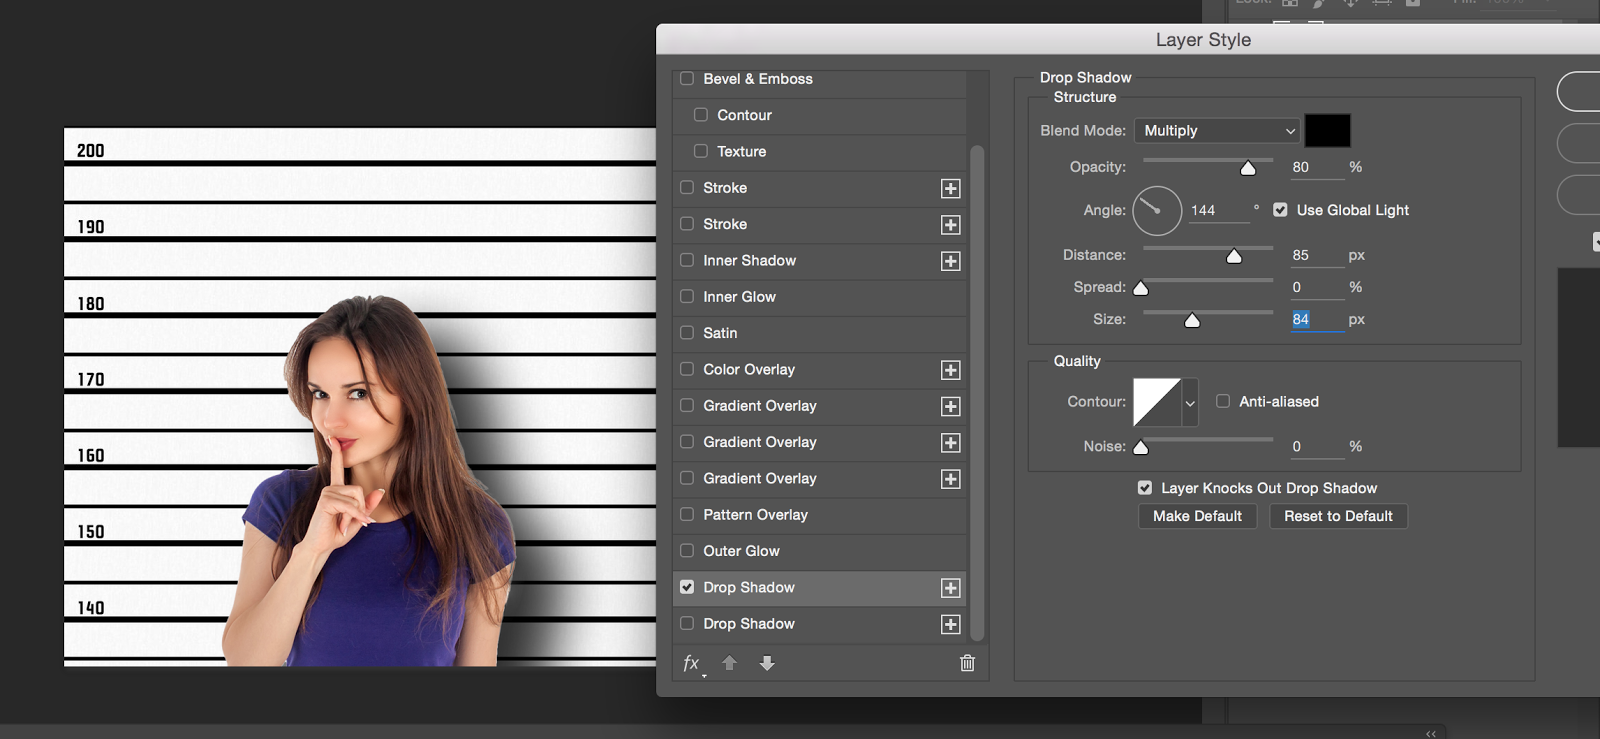
Next I created a shadow around the girl to make it more realistic. Double click on the girl in the layer panel. I chose Drop shadow. 

These are the values I used for the drop shadow. 

Last thing to do is to blur the edges of the selection of the girl with the blur tool. Merge the layers  (Cmd E) down and add some blur around the girl.

This are the basic steps to add a subject to another background. Go on, give it a go!  

Don't forget to follow us on Facebook or 500px. 


And have you already discovered our Facebook page Humans of the Nordic Region?

By the way, the picture I used comes from pixabay.com

Wednesday, March 30, 2016

How to check Before and After in Lightroom

I find it really handy (and kinda cool) to see the before and after image after I'm done with my post processing in Lightroom. Besides it being a cool feature, it also helps me to determine whether the editing was effective or maybe a tad over the top. 


Let me start with this picture:
This is actually the original RAW image without any editing

I open the picture do my editing. During the editing I get to see the before and after by clicking on this icon. When it's up, it's the before situation. When it's down, it's the after situation.
 

With all my editing done, I hit the backslash key (\) to see the before and after image. Click it once and you see the before situation. Hit it twice and you get to see the after situation. For Mac users it's Shift + Alt + 7. 

Mind you: you can also see the before and after by clicking on the icon underneath your image: 

The fastest way to compare the before and after is actually pressing the 'Y' on your keyboard. Click it twice to see just the after.

Don't forget to follow us on Facebook or 500px.

And have you already discovered our Facebook page Humans of the Nordic Region?


Friday, February 12, 2016

How to change eye colour in Photoshop

Are you ready to do some magic? This post is about changing the colour of this girls eyes.  

In the image we start with, the girl has beautiful blue eyes. 

Guess what: we're going to turn them green. Just because we can. 

And brown too! Hold on, we'll let you in on how we do it. 

First thing to do is to make a selection of the coloured parts of her eyes. Selecting this is easily done with the pen tool. When you have all the coloured parts in the first eye selected, click on make selection and feather it 0,5 px. 

On to the other eye: Ctrl and right mouse and choose make selection. Now, add it to the selection. 

Click OK and continue with choosing the Hue and Saturation Adjustment layer. 

You'll end up with two layers at this point: 

Double click on the Hue/ Saturation adjustment and the following screen appears:

Check the box for Colorize.  

To create blue eyes: these are the settings Hue 15, Saturation 25 and Lightness -35.
If you'd like to make green eyes, use these settings 75, 30 and -40

Mind you, these settings are a guideline and not written in stone. Just give it a go and see what works best. 

Don't forget to follow us on Facebook or 500px. 

And have you already discovered our brand new Facebook page Humans of the Nordic Region?


Sunday, December 20, 2015

Let it rain // tutorial on adding rain in Photoshop

With it being winter in this neck of the woods and with us longing for lots more snow, we posted a blog about adding snow just the other week. 

This blog though is about adding rain. As it might be handy to figure out how to do that too. 

Like in so many of our posts, we start with a picture from Pixabay.com

Now let's make it rain! 
  1. Add a black layer
  2. Fill this layer with black
  3. Convert the layer to a smart object
  4. Add noise:  Filter > Noise > Add Noise..  

  5. Add Motion Blur: Filter >  Blur Motion blur
  6. Change the blending mode to Screen
  7. Add Gaussian blur: Filter > Blur > Gaussian blur
Voila! The girl is now standing in a regular downpour! 

In this picture I see some motion blur on the top and bottom of the picture. So I stretched this out with Free Transform (CMSD/CTRL T). Depending on your image you can add more contrast, use Blend and reduce the Opacity of the layer. Last thing you can do is to mask out some part where you don't want the rain.

And after I've done all that, this is the end result:


Don't forget to follow us on Facebook or 500px.

And have you already discovered our brand new Facebook page Humans of the Nordic Region?


Wednesday, December 9, 2015

Let it snow! Making snow in Photoshop

In the northern hemisphere it's that time of the year again... we're longing for a white white Christmas. Or actually a white tomorrow so we can start shooting some really cool snow pictures. 

This post is useful for when you're in need of snow, but there's not much snow to be found nearby. In this post I'll describe how to add snow in an image.

I'm working with this picture from 
Pixabay. 
 
A great image in a wintery landscape, but with a bit of snowflakes falling it'll enhance the atmosphere in the image! 

I'm adding the snowflakes with a brush. So first thing to do is making my own snowflake brush: 

1. Open a new Document (Cmd/Ctrl I). I don't need a big document so I resized it to 500 by 500 pixels

2. I drew 2 black circles with the elliptical marquee tool 

3. Then I saved it as a brush. (go to Edit > Define brush Preset and name your brush.)

4. Then I closed the document and went back to my winter picture. Yes, almost ready to make it snow! Let's not forget to change the brush: hit B and open your brush

A brush can be changed by opening the brush presets (Windows > Brush presets). First thing is to change some settings under Shape Dynamics

Then I changed the scattering settings:

And the transfer settings:

Just play around with the settings to see what works best in your image.

Now let it snow! This is the point where I started adding snow to the image. It's important to build this op in layers. The snow in the background is smaller and less visible then the snow in the foreground. So make some layers with snow:

With the Erase tool (E) you can erase snow in places where you don't want it.

Last step is to add some blur to the snow to make it look more realistic. I'll add a bit of Gaussian blur to the smaller snowflakes. Whereas I'll give the bigger snowflakes both Gaussian and motion blur. 

  • Start with deactivating the foreground and the mid ground layer. Go the Filter >  Blur > Gaussian blur and add some blur. Check the effect it has in the image and choose your amount.  

  • Next step is to repeat this for the mid ground layer. So activate the layer and add Gaussian blur. 

  • I also added some Motion blur to those snowflakes.  Go to Filter > Blur > Motion blur. Change the angle and choose an amount that works well in your image (and is to your liking)


  • The last stap is to active the foreground layer and give it some Gaussian and Motion Blur.

If you want more snow you can easily copy a layer. Select the layer you want to copy and hit Ctrl or Cmd J.

You also can move the snow by using the move tool (V). 

And this is the end result: 

Don't forget to follow us on Facebook or 500px. 

And have you already discovered our brand new Facebook page Humans of the Nordic Region?