And have you already discovered our Facebook page Humans of the Nordic Region?
Showing posts with label background. Show all posts
Sunday, April 23, 2017
How to match background and foreground color in Photoshop
Thursday, April 6, 2017
How to change your background color in Photoshop
To change your background color in Photoshop is very easy.
First cut out your subject from the background
Then add a new layer underneath it and fill it with a color. Then add a Hue and Saturation Adjustment layer.
First cut out your subject from the background
Then add a new layer underneath it and fill it with a color. Then add a Hue and Saturation Adjustment layer.
Double click on the Hue and saturation to open it
By moving the hue slider you can find a color that fits best with your subject or the way you like to see your image.
Easy quick and simple !
Wednesday, March 8, 2017
Change the background color in Photoshop.
In this video you can learn how to change your background color in Photoshop.
Thursday, February 9, 2017
Photoshop Quicktip, knockout shapes in Photoshop
Photoshop Quicktip, knockout shapes in Photoshop is easy and can be very helpful
Begin with creating a new document (white). Then add a shape (for example a rectangle) and fill it with black.
Then create a second shape and make it white.
Now we fill the background with lets say Red.
Begin with creating a new document (white). Then add a shape (for example a rectangle) and fill it with black.
Then create a second shape and make it white.
Now we fill the background with lets say Red.
Now we gonna knockout the dog, so that it gets the color of the background. Click right on the dog and open the blending options. Choose in knockout = Shallow and reduce the Opacity to zero.
Now the dog has the color of the background.
So if you change the background color during your designing, the dog gets the same color.
And have you already discovered our Facebook page Humans of the Nordic Region?
Monday, January 30, 2017
Cutting Out Hair in Photoshop
One of the things people struggle with in Photoshop is with selection hair.
There are as always many ways to do it. For example using channels but this time we will try to do the job using the Background Eraser tool. This works well for a background that is contiguous.
Set your settings to this.
The tolerance is depending on your image so try and see what works best. Click on the hair to set 'the protect Foreground colour'.
Now we can paint over the background to erase it.
Just try it out and if you done it you can easily change the background.
And have you already discovered our Facebook page Humans of the Nordic Region?
Saturday, January 21, 2017
Change your background color in Photoshop
Change your background color in Photoshop using a solid color.
Open an image
Cut your subject out of the background. There are several ways to do this but in this case i used the Magic Wand tool (W). I inversed the selection and Select and Mask (under Select in the menu) to make the edges perfect.
With the selection active click on the mask icon. Now have we cut out the subject.
To change the color of the background, double click on the layer and choose another color.
Open an image
Cut your subject out of the background. There are several ways to do this but in this case i used the Magic Wand tool (W). I inversed the selection and Select and Mask (under Select in the menu) to make the edges perfect.
With the selection active click on the mask icon. Now have we cut out the subject.
Now you can add a new Solid Color Adjustment Layer. Pick a color and you have a different background.
And have you already discovered our Facebook page Humans of the Nordic Region?
picture from pixabay.com
Thursday, January 19, 2017
Photoshop Quicktip, blur the background
Here is a easy way to blur your background. Best way of course is to it in camera (F2.8 / F4). But you can also do it in Photoshop.
Here is one way to do it.
Open an image.
Next step is to make a selection of the background. There are several way to do it. I prefer to make a selection of the boy with Quick Selection Tool (W) and then inverse the selection (Cmd Shift I or Ctrl Shift I).
Then selects Blur > Gaussian Blur and add the amount of blur you want to have for your background. (is you first make a smart object of the layer you can change the amount of blur anytime)
Here is one way to do it.
Open an image.
Next step is to make a selection of the background. There are several way to do it. I prefer to make a selection of the boy with Quick Selection Tool (W) and then inverse the selection (Cmd Shift I or Ctrl Shift I).
Then selects Blur > Gaussian Blur and add the amount of blur you want to have for your background. (is you first make a smart object of the layer you can change the amount of blur anytime)
Now we have a blurred background.
PS you also can use a tilt shift blur
Monday, November 7, 2016
Use a gradient for your background color
In a previous blog we changed the background color of an picture. Now we gonna use a gradient to change the background.
Open your image.
Open your image.
Cut your subject out of the background.
Now add a new layer and fill it with for example white.
Now use the gradient to change the colors of your background
There are many many combinations possible
Thursday, May 19, 2016
How to change a background of a portrait in Photoshop
Sometimes it can be so handy to be able to change the background in a portrait. Or any picture for that matter. But this post is about changing the background in portrait shots.
Like with many other things in Photoshop, there is more than one way to do this.
One is use a texture and move (V) it to this picture. Enlarge the texture so that it fits. Then you can mask out the part where you don't want the effect and use a blending mode like overlay.
Then, the second way of achieving this is to open the image of the portrait. Then make a selection with the quick selection tool (W) and refine the edges. Choose a layer with a layer mask as output. Then move the texture to the picture of the portait. Move the layer (V) under the layer with the layer mask.
Like with many other things in Photoshop, there is more than one way to do this.
One is use a texture and move (V) it to this picture. Enlarge the texture so that it fits. Then you can mask out the part where you don't want the effect and use a blending mode like overlay.
You also can add a black layer mask and paint it in with a white brush where you want to have the effect. This is just one way to the job
Then, the second way of achieving this is to open the image of the portrait. Then make a selection with the quick selection tool (W) and refine the edges. Choose a layer with a layer mask as output. Then move the texture to the picture of the portait. Move the layer (V) under the layer with the layer mask.
You can make your background lighter or darker by selecting it and opening the levels (Cmd L)
Two relatively easy ways to change the background in your portrait images.
Don't forget to follow us on Facebook or 500px.
And have you already discovered our Facebook page Humans of the Nordic Region?
picture of pixabay.com
Wednesday, April 20, 2016
How to put your subject in another background in Photoshop
In this post we're moving our subject and placing it against another background.
I start with 2 pictures:
The goal is to move the girl to the other background (image 1) and make it look realistic. First of all, I've got to cut out the girl from her original background. To do this, I open the picture and use the quick selection tool (W).
I used refine edges to improve the selection and went with output as Selection. I right clicked on the selection and chose 'Layer via cut'. Don't forget to make the background layer inactive here.
I start with 2 pictures:
Open the picture of the background. Select the girl and move her to the new background using the Move tool (V). I used the free transform tool (Cmd T) to scale it.
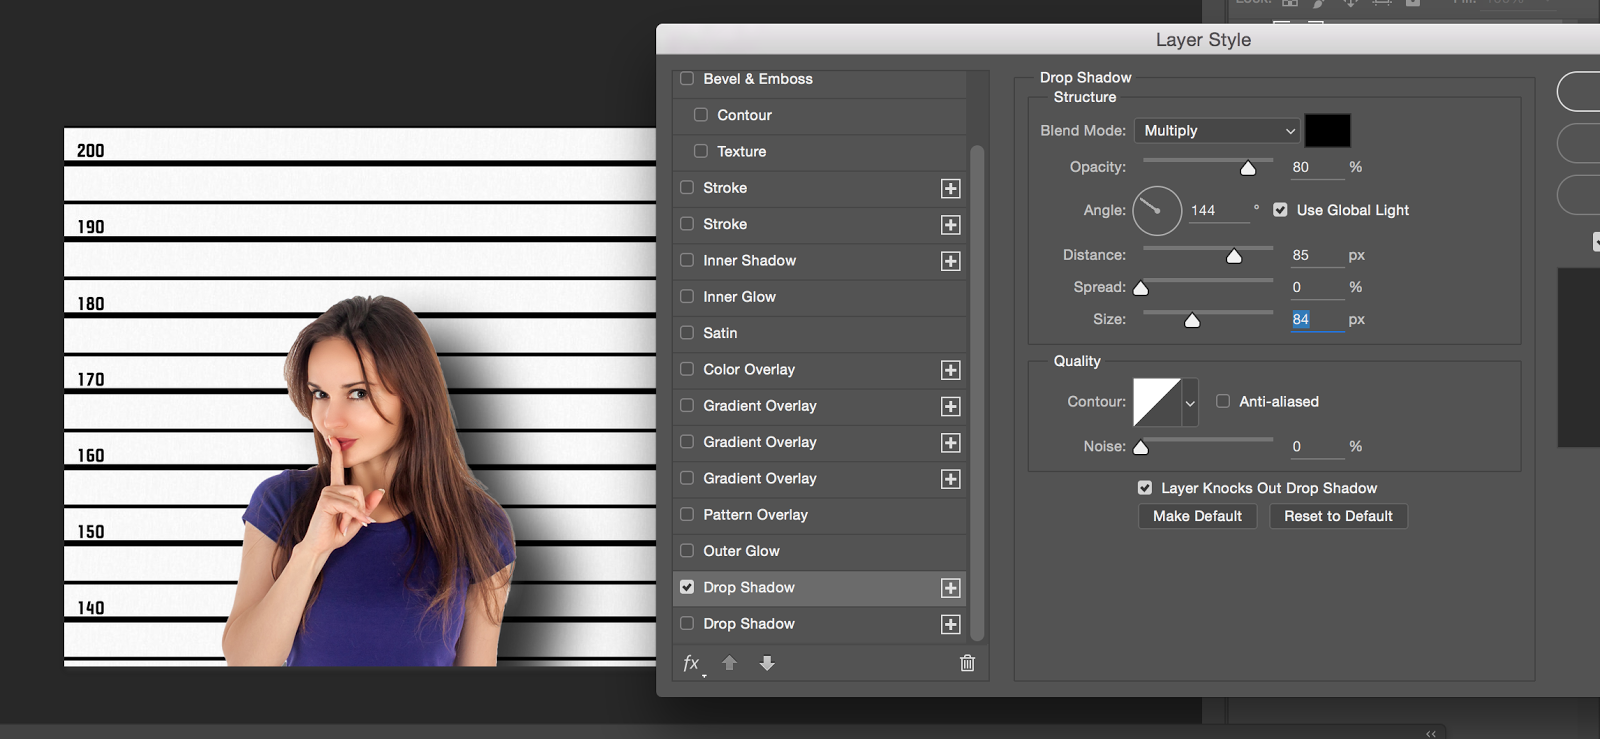
Next I created a shadow around the girl to make it more realistic. Double click on the girl in the layer panel. I chose Drop shadow.
These are the values I used for the drop shadow.
Last thing to do is to blur the edges of the selection of the girl with the blur tool. Merge the layers (Cmd E) down and add some blur around the girl.
This are the basic steps to add a subject to another background. Go on, give it a go!
By the way, the picture I used comes from pixabay.com
Subscribe to:
Posts (Atom)