Showing posts with label hamperium photography. Show all posts

Sunday, September 25, 2016

Here's an easy way to replace a sky in Photoshop

Sometimes you just want the sky in your image to be a bit more... well I guess exciting is the word I'm looking for. Even though a nice blue sky is a nice blue sky, in a picture it usually works better with a bit more going on in the sky. And let me tell you: replacing a sky is very easy in Photoshop. 

1. Select the sky you want to replace
2. Invert the selection (Select > Inverse
3. Put the selection on his own Layer Ctrl or Cmd J
4. Drag the new sky over the image and make it fit using Ctrl or Cmd T
5. Drag the new sky under the layer of step 3

In this case I added some reflections of the clouds into the sky. I made the top of the sky a little darker and lightened up the photo with a Levels adjustment layer. 

And voila: this is the end result: I think replacing the sky made the picture a whole lot more interesting. 

Don't forget to follow us on Facebook or 500px.


And have you already discovered our Facebook page Humans of the Nordic Region?


pictures from pixabay.com

Monday, September 19, 2016

How to use the clarity slider in Lightroom with portraits

This is a short blog about the infamous clarity slider in Lightroom. It's a good thing to know how to use the clarity slider (or Camera Raw in Photoshop) with portraits.

There's just one golden rule, namely: women need less clarity then men. Don't ask me why, just take my word for it. 

So when editing portrait pictures of men increase the clarity and for women do exactly the opposite: decrease the clarity.  

Let me show you two examples:


I guess for a woman, we're very much used to a soft skin. Whereas for men it's accepted to see more details of his skin. 

Then again, in some cases you can ofcourse also decrease the clarity in a portrait of a man. Just to create another atmosphere. But let me tell you that if you do it the other way around: increase the clarity in a woman's portrait, the subject of your portrait might not be too pleased. Have a go and try it out on different portraits. 

Don't forget to follow us on Facebook or 500px.

And have you already discovered our Facebook page Humans of the Nordic Region?


Pictures from pixabay.com

Wednesday, August 24, 2016

How to combine photos in Photoshop with Layer Masks

When you know the basics of Photoshop it's very easy to blend pictures together using layer masks.

Check out this vid for an explanation:

I started with these two images:


And combined them into this picture: 

You can achieve this result by dragging the pictures over eachother and using a Layer mask. After you've dragged one image over the other, paint with an opposite colour to make things visible or invisible.

When you paint on a maks always rember the following rule

White reveals, black conceals


Have a go! I found this technique to help me in improving my masking skills.  


Don't forget to follow us on Facebook or 500px.  

And have you already discovered our Facebookpage Humans of the Nordic Region?


Pictures from pixabay.com


Tuesday, July 12, 2016

How to create a collage in Photoshop

Sometimes it can be nice to presen your work in a different way. Like for example as a (poster) collage. 

And you know what, it's actually quite easy to do. Check out this video to find out what steps to take. 

Or make something like this collage from just one image. Tons of possibilities to be creative! 

Don't forget to follow us on Facebook or 500px. 


And have you already discovered our Facebook page Humans of the Nordic Region?

Wednesday, July 6, 2016

How to edit a picture in Color Efex pro 4

I told you before and I'll tell you again: I'm a Nik Collection fan! Googles free and easy to use collection of presets. 

Today I tried Color Efex Pro 4. A user friendly preset that is compatible with the Adobe software. I used it in combination with Lightroom. Here's how it works. 

Open Lightroom, pick an image and follow your normal workflow. Then, for even more editing, move to Color Efex Pro 4. 

Go to Photo > Edit in and choose Color Efex Pro 4


A pop up screen appears 
 
Most of the time, you'll choose the first option and click on Edit.

Your picture will now, with all the Lightroom edits, be opened in Color Efex Pro 4.

On the left side you have a lot of presets available classified by category.  For example Travel presets:

When you choose a preset, you can fine tune it at the right side of the screen (Global adjustment)

At the top you can compare the picture with the original. 

You can do Local adjustments by using the control points. Activate a control point and click on a specific part of the picture. There you can change some local settings.
When you're done in Color Efex Pro 4, click on the save all button and the picture will be reimported in Lightroom.

Color Efex Pro 4 has tons of templates which can be helpful to edit a picture. In combination with the Adobe Sofware it's sure to  increase your creativity

Don't forget to follow us on Facebook or 500px.

And have you already discovered our brand new Facebook page Humans of the Nordic Region?


Monday, July 4, 2016

How to HDR with HDR Efex pro 2

I've become a fan of the Nik Collection!

This post is about HDR Efex Pro 2 from the Googles Nik Collection. It's free and a good alternative for Photomatrix or Aurora HDR .

I start in Lightroom. Select the images (the under, over and correctly exposed image) and choose Export > HDR Efex Pro 2

Now HDR Efex Pro will open, showing you a page with several options:
  • Alignment: check this option when you didn't use a tripod.
  • Ghost reduction: removes image's artifacts. You can choose the strongness of this option. Also depending on the effect you want in your image.
  • Remove Chromatic Aberration.
Now click on Create HDR and voila, your HDR will be created.

On the left side of the screen you will find presets you can use. The preset can be used as a starting point. On the right side you can do global and local adjustments (control points). This is where you fine tune your image.

When done, click on Save and your HDR will be reimported into Lightroom.

In Lightroom you can edit the image even more if you want/need.

I love the way HDR Efex Pro 2 works. It offers a lot of possibilities to create a HDR image. Have a go: you can download it here.

Don't forget to follow us on Facebook or 500px.


And have you already discovered our Facebook page Humans of the Nordic Region?


Friday, July 1, 2016

How to do Text effects in Photoshop

I just saw this cool Youtube video of Darlene Hildebrand about text effect in Photoshop.  I learned a couple of new things and it also taught me about how to use Clipping masks. Check it out!

Don't forget to follow us on Facebook or 500px. 


And have you already discovered our Facebook page Humans of the Nordic Region?


Wednesday, June 8, 2016

How to use the Content Aware fill in Photoshop

A short post today about the content aware fill in Photoshop. 

Let me start with this picture: 

In this case I want more space at the left side of the picture. I can do that using the crop tool (C): 

But make sure that "delete cropped pixels" is off. That results in this image: 

Next step is to fill the transparent part of the picture. I can do this by first selecting this part of the image with the Magic want tool (M). When selected you've got to fill it. Go to Edit > Fill and choose Content aware.

Hit Ok and see to it that Photoshop is able to fill it correctly. In this case it's not perfect but not to worry, it's easy to correct (with the Clone Stamp (S) and Spot healing brush tool(J)). 

With a bit of extra work, this is my end result: 

The team of Photoshop is now working on a new feature called Content Aware Crop. Check out this sneak peek to get an idea of how it's supposed to work: 


Don't forget to follow us on Facebook or 500px. 


And have you already discovered our Facebook page Humans of the Nordic Region?

Picture form pixabay.com 

Monday, May 23, 2016

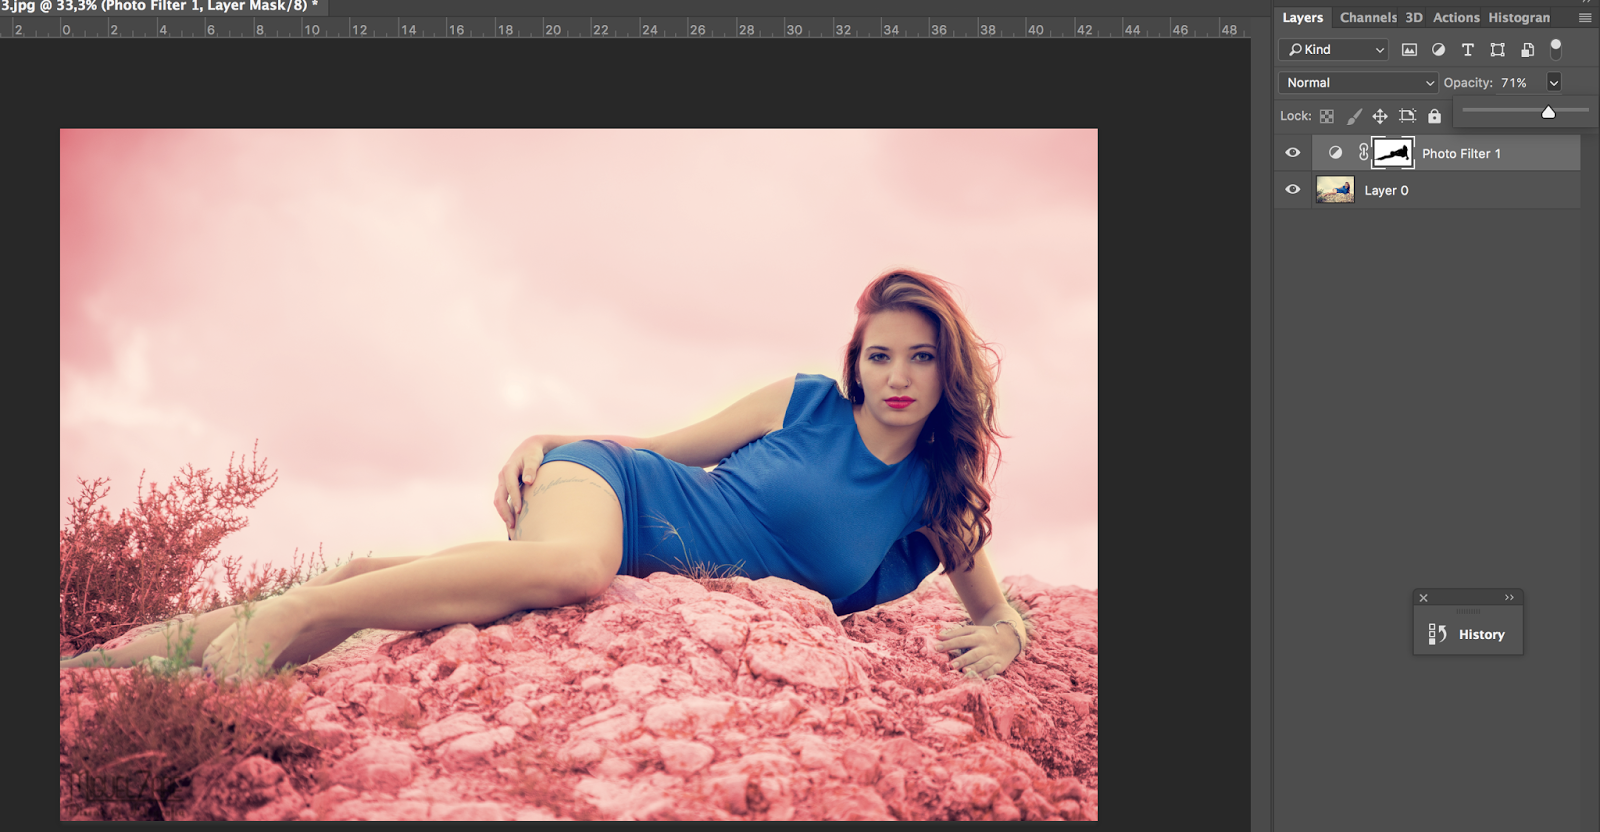
Using a photo filter in #Photoshop

A post about using the photo filter in Photoshop.  You can open a picture and give it another look and feel using a filter.  

Open the photo filter adjustment by clicking in the Layer in the menu:  Menu > New Adjustment layer > Photo filter...

Or in the adjustment Layers panel

There are many filers to choose from

With the density you can increase the effect.

Here some examples:


Or use your one color by using the color picker:
By using the mask you can decide where in your picture you want your photo filter effect and can reduce the opacity of the mask.


Try it out yourself !

Don't forget to follow us on Facebook or 500px. 


And have you already discovered our Facebook page Humans of the Nordic Region?

Picture from pixabay.com


Thursday, May 19, 2016

How to change a background of a portrait in Photoshop

Sometimes it can be so handy to be able to change the background in a portrait. Or any picture for that matter. But this post is about changing the background in portrait shots. 

Like with many other things in Photoshop, there is more than one way to do this. 

One is use a texture and move (V) it to this picture. Enlarge the texture so that it fits. Then you can mask out the part where you don't want the effect and use a blending mode like overlay.

You also can add a black layer mask and paint it in with a white brush where you want to have the effect. This is just one way to the job

Then, the second way of achieving this is to open the image of the portrait. Then make a selection with the quick selection tool (W) and refine the edges. Choose a layer with a layer mask as output. Then move the texture to the picture of the portait. Move the layer (V) under the layer with the layer mask.

You can make your background lighter or darker by selecting it and opening the levels (Cmd L)

Two relatively easy ways to change the background in your portrait images. 

Don't forget to follow us on Facebook or 500px. 


And have you already discovered our Facebook page Humans of the Nordic Region?


picture of pixabay.com