Showing posts with label photo. Show all posts

Thursday, March 23, 2017

How to edit your Instagram pictures with Snapseed

How to edit your Instagram pictures with Snapseed.  It is very easy and it does a proper job.
See this movie how it works:


Don't forget to follow us on Facebook or 500px

And have you already discovered our Facebook page Humans of the Nordic Region?


Wednesday, August 24, 2016

How to combine photos in Photoshop with Layer Masks

When you know the basics of Photoshop it's very easy to blend pictures together using layer masks.

Check out this vid for an explanation:

I started with these two images:


And combined them into this picture: 

You can achieve this result by dragging the pictures over eachother and using a Layer mask. After you've dragged one image over the other, paint with an opposite colour to make things visible or invisible.

When you paint on a maks always rember the following rule

White revealsblack conceals


Have a go! I found this technique to help me in improving my masking skills.  


Don't forget to follow us on Facebook or 500px.  

And have you already discovered our Facebookpage Humans of the Nordic Region?


Pictures from pixabay.com


Sunday, January 24, 2016

Show them it's yours!

When exporting a picture from Lightroom, it's real easy to add a watermark to your image. Sit back and read this blog to find out how to create your very own watermark. 

As always, it starts with opening Lightroom and choosing an image to work with. Click Cmd Shift E to export the image. This screen appears: 

Check the checkbox and click on the blue arrows: 

Then: click on Edit Watermarks: 
 

Now you'll get this new screen with lots of possibilities:


Like choosing your letter type and size. With the watermark effects you get to choose the location on the image where the watermark should appear.

When you're satisfied with your newly created watermark you'll want to save it. Before actually saving it, choose ´Save Current Settings as New Preset and give your watermark a name. Then click on Create and Done. 

The new watermark now appears in the dropdown list as an option for watermarks in your images.. 

By clicking on the blue arrows behind the watermark you can choose edit. Now you can edit, rename or even delete it.

So there you have it. Seems easy enough right, to create your very own watermark. I have to admit that we're using more and more metadata in our images instead of a watermark. But that's a subject for yet another post. 

Don't forget to follow us on Facebook or 500px

And have you already discovered our brand new Facebook page Humans of the Nordic Region?


Wednesday, November 18, 2015

Another Photoshop tutorial: creating and running Actions

So when you're busy post processing, you'll probably have noticed that you're doing some things over and over again. 

To make life a bit easier and post processing go a bit faster, I'd advise you to create an action for just such a thing. You can also create an action for things you find hard to remember. For example if you think the steps of Frequency Separation are hard to remember, you can make an action for it. 

What exactly is an action?
An 
action is a series of tasks that you play back on a single file or a batch of files: menu commands, panel options, tool actions, and so on. For example, you can create an action that changes the size of an image, applies an effect to the image, and then saves the file in the desired format.


If you don't see your actions go to Window > Actions

When you open the actions panel, you see a lot of actions that are already there.
If you want to use an action you can click on the play button and the action will be done.

After clicking on the play button of an action, you'll see all the steps of the action. 

OK, so let's try one. I'll start with this photo and I'll add a wooden frame. 

So I choose the action Wooden frame and clicked on the run button. The end result is our picture with a wooden frame.

Actions can absolutely be a very useful tool in your post processing. But, let me stress that I think it's important that you actually understand how Photoshop works so that can actually do the actions yourself and last but not least, that you understand why things are happening. 

Now you've seen what it looks like to run an action. Now let's make an action ourselves for Frequency Separation. Here's how it works.

  1. Click on the button Make new Action
  2. Give the Action a name and click on Record
  3. Do the steps that you need to do for your action, in this case for Frequency Separation
  4. When you're done, stop the recording in the action Panel (the first button in the row)
Now the new action is in the total list of actions. When you open the actions you'll see all the steps that you have done.


Ofcourse you should always try out your newly created action. Just to check if it runs like intended.

So choose a picture and run the action

The end result is a picture with 2 new layers where you can do the Frequency Separation

So now it's time for you to get into action. See what works best for you and add some actions in your Photoshop post processing workflow. 

Don't forget to follow us on Facebook or 500px

And have you already discovered our brand new Facebook page Humans of the Nordic Region?


All photos are from Pixabay.com

Wednesday, November 11, 2015

Sharing your pictures with the world using Lightroom mobile

When you have Lightroom you also have the possibility to synchronize it with your phone or ipad (or android tablet). You can also make pictures with for example your phone, edit it on your mobile and share it with the world. Sounds cool right? 

So here's the steps to get started with this cool app and make use of all its features: 

1. Download the Lightroom mobile app

2. Open the app 

3. Sign in with you Adobe_id 

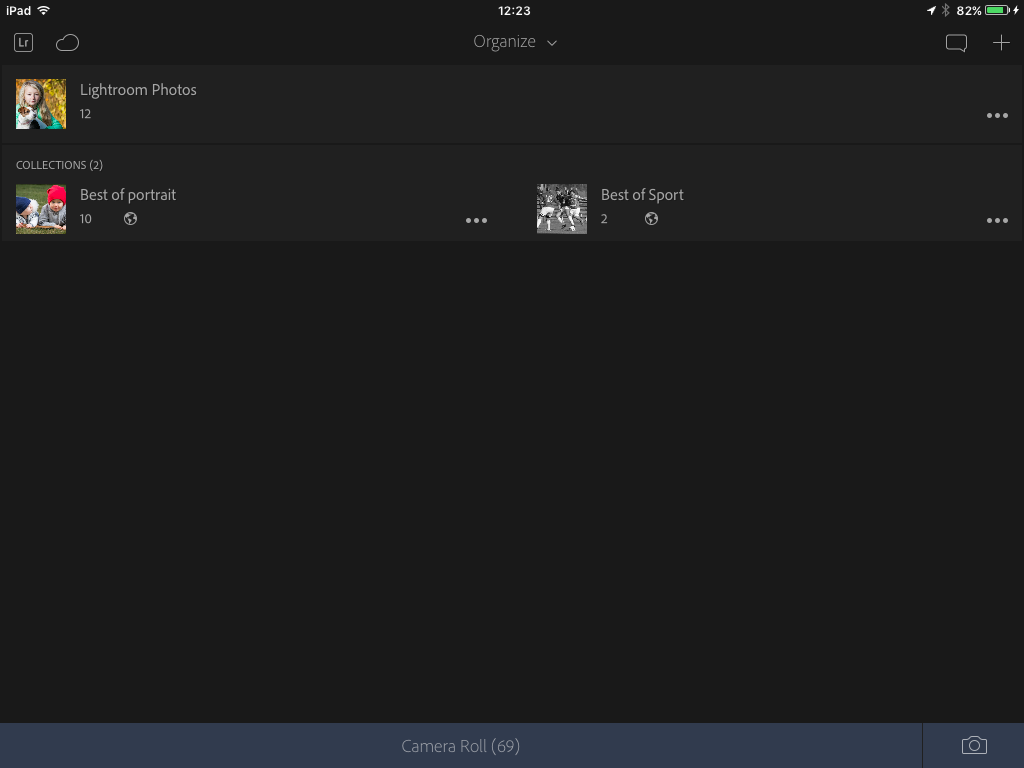
The first time you log in, it syncs all the collections that are marked as 'synced' in your Lightroom

On the first screen you'll get an overview of your collections. 

You can now open a collection and/or directly select a picture. 

The great thing is that you can do all the editing on your mobile device! 

You can also see the 'Before and After'


Besides editing you can also add images from the camera roll of your device. You can either add them to your photos or to a collection.  

Ofcourse there's also the possibility to take a new photo with your device. 

What I consider a really cool feature is that you can change your settings, for example the white balance, before you take a picture.

You can now edit your picture. 

It's also very easy to remove the pictures out of Lightroom Mobile

Exactly like in the browser version of Lightroom, you can share your pictures / collections. When you'd like to share a collection, just click on the three dots on the right. 

You can either view it on the web or share it with friends or clients

Just play around with it to see the power of Lightroom Mobile. If you'd like to read some more about this great app, check out this page from Adobe.  

Don't forget to follow us on Facebook or 500px. And have you already discovered our brand new Facebook page Humans of the Nordic Region!


Wednesday, September 30, 2015

Tutorial: make a drawing from a picture

Trying something new, forces you to grow. So this post is about something that was completely new to me. Until today.
Taking it from the top, I'm showing you how to make a photo into looking like a drawing. And believe me, it's real easy! 

1. It all starts with opening a picture in Photoshop

2. Then you make a copy from the background layer using CMD J (CTRL J in Windows)

3. Now desaturate this layer (layer 1), using CMD + SHIFT + U  (CTRL + SHIFT +U in windows) / menu: Image > Adjustments > Desaturate)

4. Then copy the layer

5. And invert the layer with CMD i (CTRL i in windows)

6. Now change the blending method of the layer to Color Dodge

7. And add Gaussian blur (menu: Filter > Blur > Gaussian blur / It's up to you to choose a radius. To each his own, pick what you think works best for your drawing

Voila! There's your drawing! 

To add a little bit of spice to it, you can add a lined paper as background. I have to say, I did erase some lines I didn't like in the drawing. I used a white brush to do so. 

Now, moving on to adding a lined paper to the drawing: 

1. Open a picture of a lined paper

2. Move the paper, using the move tool, to the drawing

3.  Make the lined paper bigger with the free transform tool (CMD T,CTRL T in windows)

4. Chang the blending mode to Multiply

Now if you want, this is the moment to paint your image. First make a copy of all layers CMD + Opt + SHIFT + E). Now you can paint with a brush with a low flow. Or you can lower the capacity of the layer to create a cool effect. 

I didn't fancy doing some painting in my drawing, so let me show you my end result. 
A drawing of a soccer girl. 


Don't forget to follow us on Facebook or 500px