Showing posts with label beach. Show all posts

Thursday, February 16, 2017

Lightroom Quicktip, brighten your image.

In this very short post we tell you a way to brighten your image.


To do this go to the develop model and increase the Shadows and Whites.  


If its still to dark increase the the exposure.  With some local adjustments like the radial filter we can brighten her face even more.


Try it out yourself.


Don't forget to follow us on Facebook or 500px.


And have you already discovered our Facebook page Humans of the Nordic Region?


picture from Pixabay.com


Wednesday, March 30, 2016

How to check Before and After in Lightroom

I find it really handy (and kinda cool) to see the before and after image after I'm done with my post processing in Lightroom. Besides it being a cool feature, it also helps me to determine whether the editing was effective or maybe a tad over the top. 


Let me start with this picture:
This is actually the original RAW image without any editing

I open the picture do my editing. During the editing I get to see the before and after by clicking on this icon. When it's up, it's the before situation. When it's down, it's the after situation.
 

With all my editing done, I hit the backslash key (\) to see the before and after image. Click it once and you see the before situation. Hit it twice and you get to see the after situation. For Mac users it's Shift + Alt + 7. 

Mind you: you can also see the before and after by clicking on the icon underneath your image: 

The fastest way to compare the before and after is actually pressing the 'Y' on your keyboard. Click it twice to see just the after.

Don't forget to follow us on Facebook or 500px.

And have you already discovered our Facebook page Humans of the Nordic Region?


Monday, September 21, 2015

Tutorial: using the gradient tool

Do you have that happen to you too? You've got this cool image, but the sky is just not the way you like it to be. 

For example when you focus on the object, the sky can be blown out. This has to to with the dynamic range of your camera. That is the ability to see the correct highlights, midtones and darks. The eye has a way better dynamic range then your camera.

In Photoshop their are many ways to edit the sky. One is to select the old sky and fill it with a new sky and blend it together. Works pretty good but there is another - very simple! - way: using the gradient tool. 

So do bear in mind that you have to make sure the new sky fits the image in the way the light falls, the colour temp, the angle etc. 

This is how it works: 
1. Open the picture in Photoshop
In this case the sky is not bad but a little flat. So we're gonna replace it with a different sky.

2. Open the picture of the desired sky in Photoshop too

3. Bring the sky to the picture in step 1 with the move tool (V)

4. Move the sky in the right position and stretch it out with the free transfom tool (Ctrl/ Cmd + T)

Tip: lower the Opacity of that layer. This way it's easier to decide the best location for the new sky.

5. Add a Layer mask to the sky

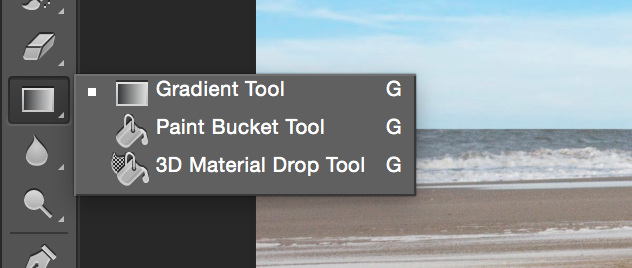
6. Use the Gradient Tool (G)on the layer mask

7. Draw a line where the gradient should be affected. Holding the Shift key makes it a straight line

Voila! You've now blended the new sky into your image. 

Like you can see in the picture above, the sky is also blended in on the bikers. But you can easily mask the sky out with black Brush (B). 

With the Opacity of the layer you can arrange how much of the new/old sky should be visible.  

And this is the end result! 

So if you see a beautiful sky don't just watch and enjoy it, but make some pictures of it. You never know when you can use this sky!

Don't forget to follow us on Facebook or 500px.