Wednesday, October 14, 2015

Using textures is easy!

I think it's fun to experiment. Finding out more about Photoshop, seeing what works and what doesn't really work so well. 

This post is about another one of those fun experiments: using textures and blending them in Photoshop. 

Let's take for example this picture:
I took this picture during a photo workshop . It's an OK picture, but for the purpose of this tutorial I'm gonna play around with textures a bit. Using Google it's easy to find some free textures: 

The issue with these is that more often than not, these are pretty small files to work with. And when you're using the picture for commercial purposes, there might just be an issue with copyright. You can ofcourse also buy textures online. For example Serge Ramelli has a bundle with some really great textures. 

Then again, why not have some fun with creating your own bundle of textures? Grab your camera and look around. I'm sure there's some pretty great textures to be found around you, both inside and outside. And there's the advantage that these are big files with high resolution. 

So I took this shot right outside our frontdoor. I'll be using this shot in this tutorial. 

How to incorporate the texture into your image: them?
  1. Open a picture in Photoshop
  2. Open the texture in Photoshop
  3. Move the texture with the move tool into your picture. You now have a picture with two layers.
  4. When both layers are active, you will just see the texture. 
  5. Now change your blending mode to, for example, overlay. But you can also try Soft light or another blending mode. Just choose one you like.
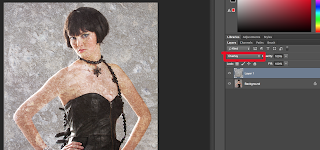
                                      

  6. The part of the picture where you don't want to have the effect of the texture should be masked out. Add a mask and paint with a black brush on the part you don't want to have the effect of the layer 
By unlinking the texture with the photo (by clicking on the chain) you are able to move the texture into another position. 
 
Bear in mind that you have to make sure to select the texture when you move it 

You can add more then one Texture and also use different blending modes. You also can reduce the Opacity of the layer when you think the effect of the layer is too strong.

I added a second layer and added a layer mask and voila, this is the end result: 

Don't forget to follow us on Facebook or 500px.


Monday, October 12, 2015

Life without colour. How to create stunning B/W images.

I guess it's a question of taste. And of what I got used to over the years. Most of my work I've done in colour. For me it's the colours that speak out in an image. The colours that draw you towards or even into an image. 

But recently I've started to see the fun and the beauty in black and white images. I still think it tricky to decide when to go black and white though. In our recent trip to Trondheim, I tried my hand at street photography, mainly to see how this would turn out in black and white. 

Street photography is a whole different ballgame and an artform in itself. This is one of the pictures I took in Trondheim, it's ok, but it's definately not eye-popping. Actually kinda boring. 

Just to get started I cropped it using Lightroom and did some small adjustments. Then I edited it in Tonality (mac only) and voila! A whole new picture, now the people in the picture came to life! Gone is the dull grey and brownness of the colour version! 

I love Tonality for converting images to black and white. And I think it's really cool that it has the possibility to work with layers. For those of you not too familiar with Tonality, I'll write a tutorial some time soon! 

Tonality has a good compatibility with Lightroom. So when you're done in Tonality, you can edit it even more in Lightroom. Another option is to use Silver Efex Pro to convert your images to black and white. And ofcourse you can also do it without a plugin and just use Lightroom to make an awesome black and white image. 

The end result is a picture with more focus on the main subject and the boring colors are gone. Impact is a lot bigger now.

But still: when to go from colour to black and white? The day I tried my hand at street photography it was a cloudy day. And this works actually really well for black and white. Check out some more examples of my day in Trondheim: 


The key to a stunning black and white image is the contrast and variation in black and white. Black and white is more than just two colours in your picture. Black and white is contrast, sharpness and different shades of black and white. Here's another example from Trondheim:  
 
I loved the reflection on the ground but this didn't work in the colour version of the image. Again, it was a dull image with no depth or atmosphere. When going black and white, the reflection that caught my eye in the first place, really popped out. And the whole atmosphere in the picture now reflected what I first felt when taking the shot. 


So bottomline is: go black and white for a reason. Don't cheat yourself with going black and white because you think black and white solves all that doesn't work in the colour version. This video of Serge Ramelli. has been a great inspiration to me for starting (again) with black and white. I love the way Serge explains things.

Don't forget to follow us on 
Facebook or 500px.


Friday, October 9, 2015

How to capture the magic

You've probably heard and read about it. With the solar storm raging, we've had some pretty amazing skies over Sweden the past days.

The night before last it was totally off the scale: pure magic! Instead of watching TV or reading my newly bought Lee Child, I checked the softservenews website to see Jämtland covered in red. Meaning highly highly active northern lights. For anyone familiar with this app it'll mean something when I say that the percentage was up to 75%.

No kidding. Just stepping out onto our balcony felt like standing frontrow on the most magical lightshow on earth. 

Although great, there's even better views around here. So I grabbed my gear and sprinted out the front door. 


How did I capture the magic?
  • You've got it. Like I said on occasion, for shoots like these, you'll be wanting to use a sturdy tripod
  • I used a shutterspeed of 30 seconds
  • My ISO was up to 320
  • And the aperture on F4
  • I guess it's even better to use a cable release, but I used the 2 seconds timer on my camera
I got back in the middle of the night. Or rather, in the early morning. So after having been out and about on Rödön, I went home to warm up and to import some pictures to see on a proper screen how they turned out. 

Couldn't help but keep an eye on the app and would you believe that the percentage was up to 99% now? No time for bed! Time to jump into the car to get to one of my favourite places to check out amazing skies: Frösön, near Frösön Kyrka. 

It was totally awe inspiring. I nearly forgot to take pictures as the northern lights were everywhere! Luckily I didn't, because I wanted to have a picture of the sky with the northern lights and with some stripes of lights of cars passing by.


I hadn't been planning this shoot. It was only by chance that I happened to check the forecast. Going out to shoot this amazing spectacle I could rely on my experience of previous shoots of the northern lights. 

Being critical of my own pictures. Seeing what can be improved, checking out how to improve. Always being on the lookout for better spots to take pictures. I'm continuously learning. 

Don't forget to follow us on Facebook or 500px.


Tuesday, October 6, 2015

Keep calm and feel the blue hour

With winter just around the corner, we lose a bit of daylight time each day. In true Cruijffiaans: every disadvantage has advantages too. This change in daylight hours makes it easier to go out and shoot in the blue hour. 

The blue hour is the period just before sunrise and just after sunset. It's that time when the sky moves from dark to blue in the morning and from blue to dark in the evening.
  • Nighttime (below -18°)
  • Morning twilights (from -18° to 0°)
    • Astronomical Twilight (from -18° to -12°)
    • Nautical Twilight (from -12° to -6°)
    • Civil twilight (from -6° to 0°)
  • Morning magic hours
    • Blue hour (from -6° to -4°)
    • Golden hour (from -4° to 6°)
  • Daytime (above 6°)
  • Evening magic hours
    • Golden hour (from 6° to -4°)
    • Blue hour (from -4° to -6°)
  • Evening twilights (from 0° to -18°)
    • Civil twilight (from 0° to -6°)
    • Nautical Twilight  (from -6° to -12°)
    • Astronomical Twilight  (from -12° to -18°)
  • Nighttime (below -18°)
Sunrise:
If you want to shoot the blue hour in the morning you gotta be on your desired location 45 minutes before sunrise. That'll leave you with sufficient time to set up your gear, because the blue hour starts approximately 30 minutes before sunset.

Sunset:
Stay put, even when the sun has just disappeared under the horizon. Blue hour during the sunset starts roughly 10 - 15 minutes after sunset.

This is an app I frequently use for checking the blue hour on my location. 

The blue hour is actually not really an hour. It's the period of approximately 30 - 40 minutes before sunrise and after sunset, depending on your geographical location and the season.

Here's some tips for shooting in the blue hour. Cityscapes, landscapes and beaches are great to shoot during the blue hour. Because these look really awesome if you use long exposure and you're not too close to a light source. Granted, that's just my 2 cents, but give it a go and see how you like it. 

To shoot the blue light, it's imperative you have a sturdy tripod preferably in combination with a remote control. Alternatively you can set your camera on the 2 seconds timer to avoid camera shake. Bear in mind that it'll probably be a bit dark when setting up your gear and setting your settings. I always make sure to bring a torch or a headlight, just for setting up. 

Here's some starting points for your settings: 
  1. ISO: 100 - 200
  2. Aperture: f8 - f22. Shooting with a small aperture (f16)  gives the starburst effects on the street lights
  3. The exposure depends on the available light on your location
  4. Last but certainly not least: shoot RAW. It gives you so much more control over the end result.
Here's a picture from the Hurtigbåtterminal in Trondheim. Just 10 minutes after the sunset.


Don't forget to follow us on Facebook or 500px. 

What's new in Lightroom CC2015 & Lightroom 6.2

Check out the new Adobe Lightroom update!

Ofcourse there are the usual bugfixes, but also Lens profile Support, Camera Supports and new features. Click here to see the complete list.

Summing up the new features: 

1. New Import dialog
Clicking on Import in Library, a new screen will appear:
When connecting your camera or Card reader, you'lll be able to choose whatever device you want to import from: 

If this new feature is not to your liking, there's ofcourse also a way to turn it off. 
Go to Lightroom > preferences on a Mac or Edit > preferences on Windows and go to the General Tab. 
Now you can turn off the checkbox > Show "Add photo's" screen

Click or browse to the desired location of your pictures

In the panel on the right, there's almost the same opportunities as before (you can open it by clicking on the wheel). The biggest change here is that the whole folder structure has actually moved to the right side of the screen. This is where you choose the destination of the files by clicking on Select. 

By clicking on the folder on the upper left side of the screen, it opens the left panel

2. Local Dehaze function
In the new Lightroom CC, the Dehaze function is available as local adjustment. It was already available as a global adjustment in the previous version. So now you can use it in the graduated filter, the radial filter ánd with the brush.


The global Dehaze function can still be found in the Effects panel in the Develop module.

Bear in mind: the Dehaze function is NOT available in the stand alone version of Lightroom 6.

So update, check it out and have fun with the updated Lightroom CC2015 and Lightroom 6.2!

Don't forget to follow us on Facebook or 500px. 


Monday, October 5, 2015

Flying high

Sure, preparation is key. 

But every now and then you just get lucky with being in the right place at the right time. This weekend, we were in Trondheim and we happened to bump into the guys from bmxshow.no. They provided a spectacular BMX show, right in the city center! 

From having prepared for cityscapes, we quickly shifted to doing extreme sports shots! These guys barrel down the 'runway' at amazing speeds, so we used fast shutterspeed on an overcast day to catch the action. 


So hang tight, we will be posting on cityscapes later on. But we thought this too cool to not share with you today! 


Don't forget to follow us on Facebook or 500px.
 

Thursday, October 1, 2015

You only fail when you stop trying

Time flies. It was almost a week ago that I hiked to the Pyramides. As you can tell by looking at the pictures, it was a pretty cloudy day. The weather forecast was a lot more optimistic than the weather actually turned out. But still, I reckon I got at least a few decent shots and with all the clouds the images get a bit more depth and colour. 


On days like these, you appreciate it even more when the sun does come out for a bit. 

But if I'm honest, I wished I had a bit more sun. So I've made a promise to myself to go back here at least once (and maybe meet the king and his following). 

I actually learned a lot of this trip. I shot some really bad pictures, some pictures that are OK but could be way better and just a couple of images that I really like. I've found that with my photography and I guess with photography in general it's a matter of learning and trying. And I consider it really important to be really critical when looking at your own images. What do you like, what can be improved and how do you reckon you'll achieve that next time? 

A few days earlier I took a stroll along the lakeside close to where we live. Although weather predictions change by the hour here, I did look at the weather forecast before I set off. It was predicted that the sun would come out in about an hour. And yep. The forecast changed while I was out because I ended up never seeing the sun! 

Wandering along the lake side in the rain I did take some pictures, trying to capture the autumnal beauty. Turned out that of all the pictures I took, there was only 1 worth saving: the one I took with my Samsung phone, go figure. 

Don't overthink your pictures. There's beauty in simplicity. 

This weekend we're off to Trondheim. I'm really looking forward to doing some architectural and street photography. I haven't looked at the weather forecast in the past days, but I'm hoping for some sunshine or at least a great sunrise and sunset to take pictures in the blue and golden hour.  

Don't forget to follow us on Facebook or 500px.