Wednesday, September 23, 2015

Tutorial: cropping in Lightroom CC

When post processing your pictures, there will be a time when you'll ask yourself: should I crop this picture? If the answer is 'yes', what is a good crop ratio?

In Lightroom you can start cropping using the Crop Overlay icon in the Develop Module.

Alternative is using the shortcut 'R'. It sure speeds up the editing when you know your keyboard shortcuts. You can find the shortcuts in the help menu of by hitting CMD / or CTRL / if you are using Windows.

When you're in the crop overlay mode you'll see these lines around your picture. You can drag the lines in the way you want to crop your picture.
I know I talked about it before, but I'll say it again: in 99 out of 100 images you'll want to have a straight horizontal line. Lightroom has an easy tool to establish just that: the straighten tool. 
Click on the icon and draw a straight line over the horizon. Your image is now perfectly straightened.

So now you know the technicalities on how to crop your picture. But what is a good ratio? Lightroom can also help you out here. Using the shortcut O gives you several crop ratios as options.

Each time you hit the O another ratio is displayed in your image.

For example rule of thirds:

Golden Spiral
By clicking SHIFT + O you can rotate the spiral 90 degrees

Ratios

You can add or delete ratio's in the menu Tools > Crop Guide Overlay > Choose Aspect Ratios


This leaves you with a lot of possibilities to crop your image. And let me say this once again: there's no right or wrong here. Just try several things and see what works best for the image. 

If I'm really honest, I crop by just looking at the image and feeling what fits best. For landscape images for example, I like it to have a panoramic look and feel. And for sports it's real easy: crop as tight as possible. 


Last but certainly not least: don't forget to make a good composition when you are actually taking pictures. You can do your cropping with your camera, like when I shot the image of this triathlete, I worked with my 400mm and waited until the athlete filled the frame before I shot the image.   

So go out there and have fun shooting great images! 

Don't forget to follow us on Facebook or 500px. 


Monday, September 21, 2015

Tutorial: using the gradient tool

Do you have that happen to you too? You've got this cool image, but the sky is just not the way you like it to be. 

For example when you focus on the object, the sky can be blown out. This has to to with the dynamic range of your camera. That is the ability to see the correct highlights, midtones and darks. The eye has a way better dynamic range then your camera.

In Photoshop their are many ways to edit the sky. One is to select the old sky and fill it with a new sky and blend it together. Works pretty good but there is another - very simple! - way: using the gradient tool. 

So do bear in mind that you have to make sure the new sky fits the image in the way the light falls, the colour temp, the angle etc. 

This is how it works: 
1. Open the picture in Photoshop
In this case the sky is not bad but a little flat. So we're gonna replace it with a different sky.

2. Open the picture of the desired sky in Photoshop too

3. Bring the sky to the picture in step 1 with the move tool (V)

4. Move the sky in the right position and stretch it out with the free transfom tool (Ctrl/ Cmd + T)

Tip: lower the Opacity of that layer. This way it's easier to decide the best location for the new sky.

5. Add a Layer mask to the sky

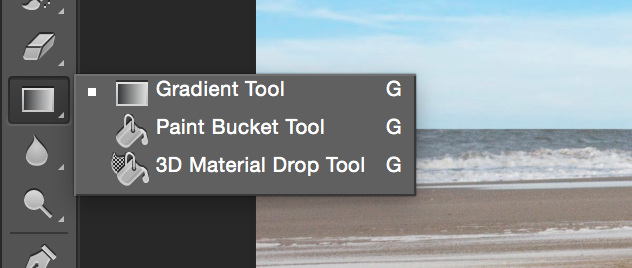
6. Use the Gradient Tool (G)on the layer mask

7. Draw a line where the gradient should be affected. Holding the Shift key makes it a straight line

Voila! You've now blended the new sky into your image. 

Like you can see in the picture above, the sky is also blended in on the bikers. But you can easily mask the sky out with black Brush (B). 

With the Opacity of the layer you can arrange how much of the new/old sky should be visible.  

And this is the end result! 

So if you see a beautiful sky don't just watch and enjoy it, but make some pictures of it. You never know when you can use this sky!

Don't forget to follow us on Facebook or 500px.

Friday, September 18, 2015

Basics: sharp as a knife!

I guess it goes without saying that it's of great importance that the subject of your picture should be sharp. In focus and sharp. 

When doing a portrait shot, you'll want to focus on the eyes. When the eyes are in focus and sharp, you'll really create the feeling that the person in the picture is actually looking at you, the viewer. Use a low aperture and focus.   

When out and about to shoot some awesome landscape pictures, you'll want to create an image where the whole scene is in focus and sharp. In that case use a higher aperture than with portrait shots. For example I shot this landscape in Queenstown New Zealand on F14.


Every now and then you'll want to give your pictures just a tad more sharpness in post processing. Sweet and easy with software like Lightroom and Photoshop.


So in Lightroom it's very easy to sharpen an image in the develop panel: go to Detail. 


The exclamation mark offers you the possibility to zoom in. That way you have more control over the amount of sharpness you want to apply to the image.

With the amount slider you can add sharpness to your image. The more to the right, the more sharpness you apply. Do keep an eye out for over sharpening. That'll really mess with your picture. 

The radio and detail sliders are a bit more technical. Personally I'm in favour of using them rather than the amount slider. This guy did a great job in explaining about these sliders in this article.

The masking slider works well as a mask. You can mask out areas where you don't want the sharpeness. This actually works really well for skies. You'll want to have a really sharp sky. So by clicking ALT and move the slider to the right it masks out part of the image and where your picture becomes black, extra sharpness will not be applied. 

So now if you work in Photoshop, there are several ways to add sharpness. You can find them in the filter menu. 
 

I usually work with the unsharp mask. In this article you can find more information about sharpening in Photoshop.

But there is another way in Photoshop to sharpen an image. It's called High Pass and you can find it in the filter menu: Filter > Other > High Pass. 

How does this work?

1. Open the image and do your editing. Sharpening is usually the last step in your workflow.

2. Select the top layer and click on CTRL/CMD + SHIFT + ALT + E to create a new merged layer.
Now you havea new layer (layer 1)

3. Filter > Other > High Pass

Move to a part of the image where it's very important to be sharp, for example the eyes. 

With the radius slider, you than add more sharpness by dragging it to the right. Click around to see what amount works best for you and then click on OK. Radius around 1 pixel is mostly considered OK. But look at your image and see if its enough and not over the top.

4. Change the blend mode of the layer to Overlay


5. Now you added sharpness to the image. Final step is to flatten the image (Layer > Flatten Image)


Don't forget to follow us on Facebook or 500px.


Wednesday, September 16, 2015

Basics: what's stopping you?

Do you sometimes feel like you just don't have any inspiration? Or how to create that powerful image? Or just have the simple question, where are the hotspots in town ?

Thank goodness for the net! 

So you're suffering from a lack of inspiration. Check out Flickr or 500px to see loads of great pictures that can inspire you. Let the colours and compositions draw you to new ideas. What also works for me is to just go to town. Any town'll do. Take a walk and look around you. With you head filled with inspirational ideas from checking out Flickr and 500px, you might just see your surroundings in a whole new light. 
It can also be a good idea to go out and shoot with a prime lens. Take just this one lens and go out to shoot an entire day. Forcing you to be creative, to find new ways to properly capture what you see. This video of Marc Wallace gives some more insight. 
And ofcourse, it's always a good idea to check out what other photographers are doing. Photographers you follow on social media are easy to check out. I'm a fan of the work (and workflow) of Serge Ramelli. It always works for me to check out his latest tutorials and publications to give my inspiration a boost. 

When going on the net, it happens to me quite regularly that I see a picture and wonder how did they do that? 
There's ofcourse several answers to that question. One way is to look on Youtube. If you want to know how for example digital blending works, just type in digital blending and you'll get a zillion hits. 
Guys like Serge Ramelli and Aaron Nace publish heaps of free tutorials. If you're really into their stuff, there's also great paid tutorials available. 

An other way is to look into the EXIF data of a picture. In the EXIF data you can find things like exposure, aperture and ISO (and a lot more). This can help you a lot to understand how to make a (simular) image. On Flickr you can see the EXIF data of a lot of pictures.


This EXIF data can help you when going out there to shoot yourself. 

So, now you've got the inspiration flowing, you know how to create that really cool image and you're off to a city. What is the best spot in town to make your great images? 

A very good site with a lot of high quality images is 500px. Let's say you're off to Amsterdam and you have no clue about the hotspots.


Other way is to visit the map of 500px. Just find your town and zoom in and you get images and their location.


So don't let anything stop you to pick up your camera and shoot. Have fun out there, go shoot some great pictures! 

Follow us on Facebook or 500px.

Monday, September 14, 2015

Basics: keep calm and shoot RAW!

When you take pictures and want to get more out of your pictures, you should consider shooting in RAW format instead of JPEG.

What is RAW ?
RAW is a format that captures and saves all image data on your memory card. When you shoot in JPEG format the file is compressed and processed by your camera. This means you lose a lot of information. 
Because you've got all the information when shooting in RAW, your files are considerably bigger. But memory is cheap these days so don't let this be an excuse! 

Right: set you camera on RAW:

There are a lot of options. You can choose how big you want your RAW file to be. I like it as big as possible. You never know when your picture will be out on some billboard some day. There's also the possibility to shoot RAW in combination with JEPG.

In case of the latter, your camera makes a RAW image and a JPEG image for each picture you take. Feel free to try, but you've got to realise you'll end up with a heck of a lot of images after the shoot. 

For some reason, all different camera brands use a different file extension for their RAW files. For example:
  • Canon  => .CR2
  • Nikon  => .NEF
  • Pentax => .PEF
  • Sony    => .SR2
Adobe has also his own RAW extension and they named it . DNG (Adobe's Digital Negative).  When you import your files into Lightroom you've got the possibility to convert the files to .DNG. 
I consider this a clever option, because that way your file is smaller, still a RAW file and always compatible with the products of Adobe.

To sum it all up: here are some reasons to shoot RAW
  1. Highest level of quality.
    You've got all the information on your memory card and it's not compressed 
  2. Its easier to control/change you white balance. If you shoot with an incorrect white balance its very easy to correct that in Lightroom. There are a lot more possibilities then when shooting JPEG. 
     
  3. Better Detail. You've got more control in sharpening your image. So you get better prints.
  4. Better Colours.
  5. Non-destructive editing. Every time you edit a JPEG you lose quality. This is not the case with RAW, because you're not editing the original file. So you can easily go back during the editing or reset the image and start all over again.
  6. Its easier to correct over or under exposured pictures.
And last but certainly not least: the best reason to shoot RAW is that you, as an artist, have all the control over the image instead of the mechanical device that is called a camera. 

A few things you have to keep in mind: 
When looking at the little screen at the back of the camera, you see a JPEG version of your image (even if you shoot in RAW) so it can be a big disappointment when you open your pictures in Lightroom. Where are all the colours, contrast and sharpness? 
When you shoot JPEG, your camera does all this kind of stuff for you. But now you must make the decisions. So in Lightroom you have to add colour, contrast, sharpness etc.... 
But it has the big advantage that you can give it the look that you want to achieve. 

Is JPEG wrong?

Their are ofcourse reasons for sometimes shooting JPEG instead of RAW. For example sports photographers who are shooting for a wire company often prefer shooting JEPG because of the speed. It's easier and faster to send a small JPEG then a big RAW file.

And a image in JPEG can be put directly onto the net (Flickr, 500px, photoshelter, blog, website) whereas you can't do that with a RAW file (a RAW file needs to be processed with for example Lightroom and then exported to a JPEG). 

I prefer to see all my pictures on a bigger screen first, before I lay them out on the net. Like with everything else that's published here on our blog: the choice is yours. Be bold and experiment. Find your own style! 


Follow us on Facebook

Friday, September 11, 2015

Basics: get on your knees!

In a previous post we wrote about the importance of being close when shooting sport: be there were the action is. Close is one thing butbeing low is also important.

Being close is something you can achieve with a zoom lens like a 400 mm. But you can cheat and crop your picture (a lot) to get even closer.
There's no cheating in Photoshop or anywhere else for creating a low point of view. When shooting sports, get down on the ground to be as low as possible.
Where there's no cheating in Photoshop to create a low point of view, you can get yourself some tools to make it a bit more comfortable: a small chair to sit on.
All this talk about getting low when shooting sports. What's the reason behind this? Why do we recommend to be as low as possible?
It's actually the same reason as for being close when shooting sports. You wanna be there where the action is. If you are more or less on the same height level of the play and/or the players, you automatically become part of the game. You can feel the action. Not to mention the ball sometimes...


When shooting from a low point of view, your picture tells a different story then when shooting standing up. You're part of the game. You're in on the action. 

Then again: it's not always possible to shoot from a low point of view. When you go to your local soccer game, you can probably sit low right next to the pitch. But when you go to your favourite top level club you are stuck behind the boarding. That's where you're flexibility as a photographer comes in. Bend and twist and turn a little so you can create your low level shooting point even from behind the boarding. You don't want to tower over the players when shooting, so try and get as close to the action as possible. 
 
It's a decent picture but still, you miss the feeling of being part of it. Being in on the action. 

In the following picture I was at the right side of the boarding and with a 400 mm I could get in close and position myself low. You can feel the action! 


There are sports where it's easy to get low and close to the action. Go to any running or cycling event and if you get there on time, you'll be able to find yourself a cool spot to take some really fab action pictures. Then again, there are sports where you can't get close unless you have an accreditation. If you're serious about your photography, make sure you have some good images posted online and ask for the accredition. 

This shot of current Vuelta leader Tom Dumoulin was taken while I sat ON the road. It was during the Dutch time trial championships I took this image. But only after I got the accreditation I could get in so close on the action.  

Same goes for any big city marathon you go to. Do some reconnaissance of the track, make sure you know where the best light is and get there on time. This is a shot of Hilda Kibet, taken during the Rotterdam Marathon. And again, I was sitting ON the road to be able to shoot from a low angle. 


But heck, rules are meant to be broken. For this shot, during the Grandslam Beachvolley in The Hague, I was high up on the stands because I wanted to get a shot with a different look and feel. 

There's cool sports events everywhere. Just check your local newspaper and Google is your friend.
So get out there, go low and get close. And to top it all off, it does create a stunning image if you can have eye contact too.


Follow us on Facebook