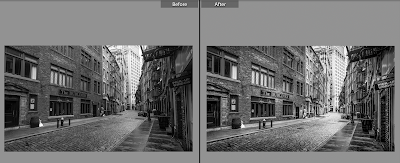
When editing in Lightroom you can use the brush, radial filter and the graduated filter to dodge and burn and make your images even more interesting.
I downloaded this image from Pixabay.
First step is converting it to black and white
Then i followed my usual workflow:
- boost the contrast
- bring down the highlights
- increase the shadows
- black and whites
- and in this case I added some overall clarity
Then I added some radial filters (100% feathered) to give some parts of the image more attention.
With the brush I lightened the road a little to make it a stronger leading line.
Then I closed the picture with a graduated filter at the top and the bottom
To see what you have done you can press Y to see the before and after
The dodging and burning gives the picture more depth and leads the viewer through the picture
So have a go. Don't be afraid to experiment.
And: don't forget to follow us on Facebook or 500px. Have you already discovered our Facebook page Humans of the Nordic Region?


No comments:
Post a Comment