Thursday, April 14, 2016

How to transform photos into portraits of inked strokes

Kind of a nifty feature if you ask me: creating a portrait with inked strokes. Let me show you how to do it. 


Open a picture and change it to a smart object: 


Make a copy of the layer (Cmd J) and change its blend mode to lighten


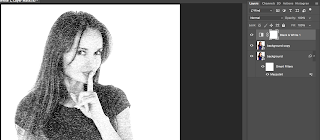
Make the background layer active. Go to Filter > Pixelate > Mezzotint and choose Type = Short lines. Click Ok


Because the layer is a smart object, you can change the type later if you'd like another effect. Make the top layer active and add a black and white adjustment layer

Add a new empty layer and fill it with white

Select the Elliptical Marquee Tool and draw a circle over the whole layer

Choose Select > Transform selection. Make the size 90% on the top of your screen

Go to select > Modify > Feather and feather it 200 px and click OK

Now we fill the selection with Black and deselect the selection (Cmd D)


Add the Mezzotint filter to the layer

Go to your channels and click on the Load channel as selection icon at the bottom of the channel

Invert the selection using CMD Shift I

Go back to the layers panel and click Delete and deselect the selection (Cmd D)

To bring some colour back into the image click on the layer mask of the black and white adjustment layer. Choose a brush with 0% hardness and an Opacity round 30%. Make the brush big and paint the face. Make the brush a bit smaller to paint over the mouth and eyes and any other parts where you want to have more colour.
There you have it: the inked strokes portrait! 


By clicking on the filters you can change the effect to for example long lines

Don't forget to follow us on Facebook or 500px

And have you already discovered our Facebook page Humans of the Nordic Region?


Wednesday, April 13, 2016

How to create a template in Photoshop

I love Photoshop. You've got so many possibilities! One of the great things is to create templates with Photoshop. For example for when you're making a magazine, a book or a brochure. Let me tell you how it works. 

First of all: create a new document with Cmd N (use Ctrl on Window).

So now I have this empty white image where I can start my design: where to put the images, where to have text. 

Go to View > New Guide Layout. In this pop up you can make your basis design. Choose the number of rows and colums and choose the space you want between them. You can also choose a margin around the design.

Click Ok when finished.

Next is to decide where to have the text and images in the picture. I'll start with the images by using the retangle tool (U).  I added it with a foreground that's grey


It's pretty much up to you what object you use for your images. A rectangle is pretty basic.
By selecting the move tool and holding the option key (alt on windows) you can duplicate the rectangles. 

When you have placed all the rectangles in the template you've got to convert them to a smart object. Ctrl Click on the first rectangle and choose  'Convert to smart object'.

Last thing to do is to group all the rectangles (images). Select all of them and hit Cmd G. Rename the group to images.


Now I'm ready to place the text blocks in the template. Use the Text tool (T) to create text blocks. To fill it with dummy text go to Type > Paste Lorem Ipsum.   

Select all the text and group it using Cmd G. 

There you have it: all the basics are set in your template. Ofcourse you can carry on designed to your hearts content, it's all up to you! 

Using Cmd H you can view the result without the guide lines.

Don't forget to save the template as a PSD.

Voila! There is the template that can be used over and over again, filling it with the desired content. I will touch upon the latter in a future post. 

Don't forget to follow us on Facebook or 500px


And have you already discovered our Facebook page Humans of the Nordic Region?


Sunday, April 10, 2016

How to fill a template in Photoshop

So I showed you how to make a template in Photoshop in one of my previous posts. This post is about filling the template with your images.  

Remember creating a group with all the images in your template:  

I'll start with using the big picture. Double click on it in the layer panel. Because it's a smart object it'll open as a separate document.

To fill it with an image go to File > Place embedded...
 
Now stretch out the image to let if fill.  Close the image (Cmd W), place and save it. The image will now be saved in your template:

So now I'll start filling the other images. And you can ofcourse start working on the text for your brochure or book. 

Because of the use of smart images, you can easily change a picture.

One last thing. Instead of a white background, you can also use a picture as background. To do this, copy the background layer and convert it to a smart object. Double click on the background copy and it'll open in a separate document. Use File > Place embedded... to pick a image you like. Place, Close and save it.

It might be smart to reduce the opacity of the layer to push it more to the background.  
You also can add a Layer mask and use a black to white gradient to mask part of the background out.

There you have it: I've filled my template with my own images. I think it's great fun to experiment and learn. I hope you'll have fun with it too! 

Don't forget to follow us on Facebook or 500px


And have you already discovered our Facebook page Humans of the Nordic Region?

Thursday, April 7, 2016

Creating a HDR with Camera Raw

There are so many ways to create beautiful HDR images. You can use the software of Macphun, Photomatix, Lighroom or Photoshop. But did you know that you can also use Camera Raw?

I started out with dragging my raw files into Photoshop. Now the Camera raw filter opens: 

You can see the filmstrip. Click on Select All:

This is where you can do some small adjustments, for example changing the white balance before you merge the images to a HDR.

Now here's where the magic starts: click on Merge to HDR

Click on Merge

Choose a file name and then Save

The HDR image is now available in the filmstrip:

This is the point where you can edit it even more with the Camera raw sliders. After that you can even open it in Photoshop for more adjustments.


Don't forget to follow us on Facebook or 500px

And have you already discovered our Facebook page Humans of the Nordic Region?


Wednesday, April 6, 2016

Inspiration for your photography

I know, I blogged about this before. But I think it's important to blog about it again because I came across this really cool video. It's a TED talk by Erik Johansson and totally love it.  It reminds me of the work of Adrian Sommeling and it gave me so much new inspiration and new ideas! 

Just Google these guys to get an idea of their work:  
Adrian Sommeling

 Erik Johansson

If you ask me, the best sentence in the TED talk of  Erik Johannson is  'Capture the idea instead of capture the moment.'  

Another photographer I totally love is Serge Ramelli. Recently he made some videos called 'On the trail of Ansel Adams' (videos). It inspired me to make more black and white landscape pictures.  

Go out there, either on the net or outside or listen to some great music. Let that inspiration come to you! 

Don't forget to follow us on Facebook or 500px


And have you already discovered our Facebook page Humans of the Nordic Region?

Monday, April 4, 2016

How to remove spots using in Lightroom

Sometimes when I edit a picture, I discover little or bigger spots on an image that don't belong there, like sensor dust. Luckily it's easy to remove these spots in Lightroom using using the Spot removal (Q).

When clicking on the Spot Removal tool you'll get 2 possibilities:- Clone- Heal

When you choose Clone, Lightroom will clone exactly to the pixel from a specific area. But when you choose Heal, Lightroom will attempt to make subtle changes to the way Spot is filled

With the size you can make your brush smaller of bigger, but it works faster by scrolling your mouse and make your brush bigger or smaller.

Feather is the way to make harder or softer edges to your brush strokes. Most of the time when you're doing spot removal, you'll use a feather of 100. This way you won't see the edges of your brush. Opacity is the strength of your brush. So when you use 50% opactiy your spot will disappear for 50%.

Let me show you how it works with this picture in Lightroom: 

Make your brush a little bit bigger then the spot and paint over it:

Lightroom tries to find an area to sample. You can drag it around to find a better area.  Then go to the next spot and repeat the same process. When all the spots are removed click on Ok and your image is clean.

When the spot removal tool is active you'll see 2 more options in the toolbar (T)- Tool Overlay- Visualize spots


With the Tool overlay you can choose if you want to see where you did your spot removal. With visualize spots the screen appears in black and white and you'll see the spots right away. 
 

So this is a really handy too to remove the spots: 

Most of the time I think Lightroom does a pretty good job with the spot removal. However, if you're not satisfied with the result, you can always resort to Photshop to fix the spots there. 

Don't forget to follow us on Facebook or 500px

And have you already discovered our Facebook page Humans of the Nordic Region?


Friday, April 1, 2016

How to isolate your subject from the background in Photoshop

One of the most important things in an image is that you lead the eye of the viewer to the subject of your picture. In this post I want to show you how to isolate your subject from the background, using Photoshop. 

This is the picture I start with: 

I got this image from pixabay by the way. It's a great example for this post as I consider the background way too bright compared to the foreground. I want more focus on the couple, I want to isolate them from the background. There are several ways to do this in Photoshop.

Here is one way to do it:

Select the subject with the quick selection tool (W)

Use refine edges to make the selection better.

Choose 'New Layer with a layer mask' as output and hit OK

By the way, if you'd like to know more about the 'Refine Edge Tool' watch this video made by Phlearn

Now I've got the subject on its own layer and this makes it easier to start working on the background layer. Select the background layer and hit Cmd U to reduce the colours of the background:


When finished hit OK.

And voila, this is my end result. The background is less saturated now, and I even made it a bit darker. This way there's more focus on the subject of this image: the couple. 


Another way of doing it is by using for example a B/W adjustment layer 


Or a curves adjustment layer


Don't be afraid to try this out. There's many more ways! 

Don't forget to follow us on Facebook or 500px.

And have you already discovered our Facebook page Humans of the Nordic Region?