Wednesday, November 11, 2015

Sharing your pictures with the world using Lightroom mobile

When you have Lightroom you also have the possibility to synchronize it with your phone or ipad (or android tablet). You can also make pictures with for example your phone, edit it on your mobile and share it with the world. Sounds cool right? 

So here's the steps to get started with this cool app and make use of all its features: 

1. Download the Lightroom mobile app

2. Open the app 

3. Sign in with you Adobe_id 

The first time you log in, it syncs all the collections that are marked as 'synced' in your Lightroom

On the first screen you'll get an overview of your collections. 
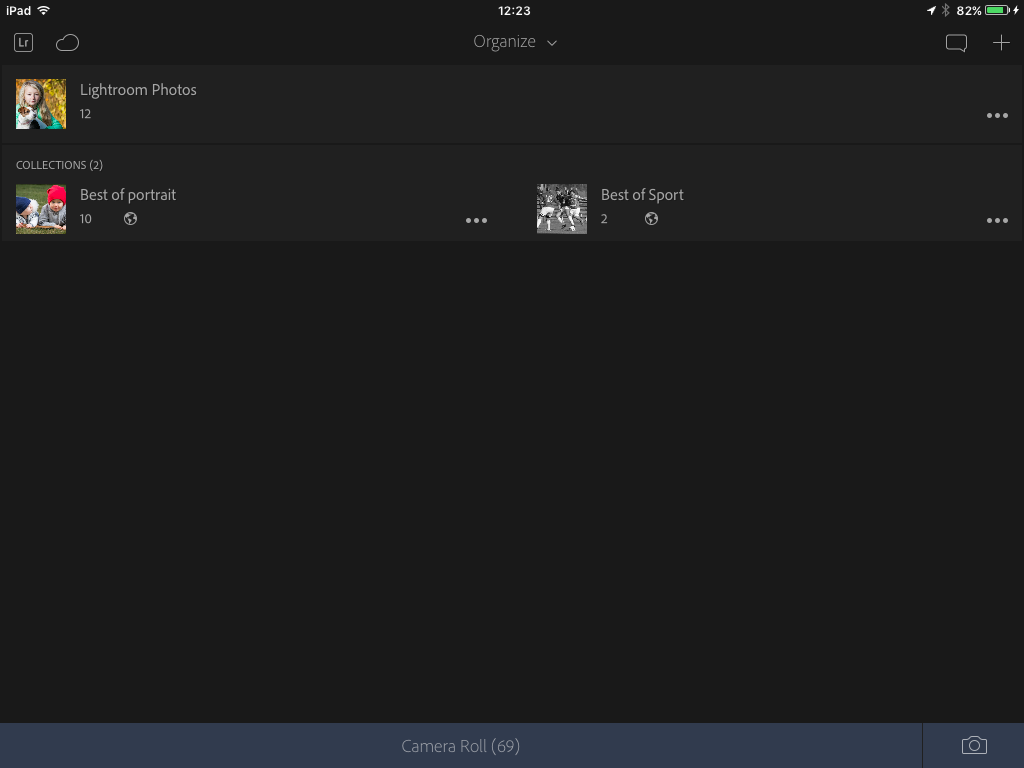
You can now open a collection and/or directly select a picture. 

The great thing is that you can do all the editing on your mobile device! 

You can also see the 'Before and After'


Besides editing you can also add images from the camera roll of your device. You can either add them to your photos or to a collection.  

Ofcourse there's also the possibility to take a new photo with your device. 

What I consider a really cool feature is that you can change your settings, for example the white balance, before you take a picture.

You can now edit your picture. 

It's also very easy to remove the pictures out of Lightroom Mobile

Exactly like in the browser version of Lightroom, you can share your pictures / collections. When you'd like to share a collection, just click on the three dots on the right. 

You can either view it on the web or share it with friends or clients

Just play around with it to see the power of Lightroom Mobile. If you'd like to read some more about this great app, check out this page from Adobe.  

Don't forget to follow us on Facebook or 500px. And have you already discovered our brand new Facebook page Humans of the Nordic Region!


Monday, November 9, 2015

Cool features! Adobe Lightroom in a browser

I love working with the Adobe suite. And now with Lightroom, you've got the possibility to connect it with your iPad and phone, using the Lightroom mobile app. 

What I reckon is a great feature that you have the possibility to work on or show your images in a web browser. It's so easy! 

So how does it work: 

Go to https://lightroom.adobe.com/ (on any one of your devices)

Log in with your Adobe_ID
You'll now be presented with the start screen

It syncs the pictures from Lightroom that are in a collection. When you make a collection in Lightroom, there is also the possibility to sync it with Lightroom mobile

In this case I added 2 pictures to a new collection in Lightroom:  

When you go to the browser and refresh it, voila! The pictures appear in your browser.

And when you have acces to a device, you can view your images and edit them without even having Lightroom. Open a picture and you'll see the edit button in the left corner of the screen:

Click on edit and fire away

When you're done editing, click on the Save and Exit button. In this case I made the picture B/W

And when you're back at your usual post processing station and open Lightroom, you can see what work has been done, in Lightroom! 

Another cool thing is the possibility to share pictures. Click on a collection and choose share


Now you can share the pictures with for example a client.  Just share the Link in the screen above with your client. The client can then open the link and see all the pictures you've shared. 

And ofcourse, there's also the possibility to share on Facebook, Twitter and Google+.

I had great fun checking this out! So go and find out for yourself how useful these features are. 

And don't forget to follow us on Facebook or 500px. And have you already discovered our brand new Facebook page Humans of the Nordic Region?


Friday, November 6, 2015

Dodge and Burn, part 3 // Using channels

To end this special Dodge and Burn week, here's one more post about it: dodging and burning using channels. It's fast, it's easy and you can use it as a seperate technique or in combination with other dodge and burn tool(s).

So this is how it works: 

1. It all starts with opening the picture you want to use. In my case it's an image of Marino Vanhoenacker, during his win in the Ironman triathlon in Luxembourg.

Search Results


2. Then, open the channels

3. Next: hold down the CTRL or CMD key and click on the RGB channel. You can see that several parts of the picture are selected. 

These are the lighter parts of the image. Make a layer of the selections using CTRL or CMD J. When you go back to your layers you see there are now two layers. Rename the top layer to screen. 

4. Now click on the background layer and go to Channel. Click on the RGB Channel again using holding down CTRL or CMD. Again you see a selection of some part of the pictures . As told in the previous step these are the lighter part of the image. But this time, I want to select the darker parts of the picture. So invert the selection using CTRL or CMD I.

5. Then click on CTRL or CMD J to make a layer of the (inverted selection). Go back to layers and rename this new layer to multiply. 

6. Rename the blending mode of the screen layer to Screen. Rename the blending mode of the Multiply layer to Multiply. 

Voila! There's a picture where we did some dodging and burning using channels!

But, did I like the actual result? Naah, the darks where too dark for my liking. So what did I do? I reduced the Opacity of the layer to a point where I was satisfied with the result. Like I said in some other posts also: make sure that the focus is on the subject of your picture. In this case it's Marino. I want to have the effect in him instead of on the entire picture. So I added a black mask to the screen and multiply layers and I used a brush to white out the areas where I wanted to have the effect.

And this is the end result. 

Don't forget to follow us on Facebook or 500px. And have you already discovered our brand new Facebook page Humans of the Nordic Region!


Wednesday, November 4, 2015

Dodge and Burn, part 2 // Using the tool menu.

Thought part 1 was interesting? Wait until you read this. For this post I'm using the 'dodge and burn' form the tool menu. (CTRL/CMD O).

Looking at the top of the screen, I see the following options:  

I chose a low exposure of around 10%. I think it's important to build it up slowly, the dodge and burn. Just so you don't overdo it. You can work on the shadows, highlights and the midtones. I prefer to work with the midtones. 

For this post, I picked this image of Team4Talents triathlete Bas Diederen. I shot this picture during the Dutch championships Triathlon in Veenendaal.

So, like I said in part 1, the principle of dodge and burn is too make the lighter part lighter and the darker part darker.  

Moving on: 
1. Open the picture
2. Add a new blank layer and fill it with 50% grey (Edit, Fill, 50% gray)
3. Change the blend mode to Soft Light. You also can use the blend mode overlay. Switching between the blend modes when you're done gives you the opportunity to compare and see what effect you like most. 
4. Select burn tool and make the dark parts darker
5. Hold down the Option key to switch to the dodge tool and make the lighter parts lighter. Mind you, I'd advise you to take your time and build it up slowly. Don't forget to switch between the blend modes every now and then to see the effect of your actions. 

For example: by selecting just the gray layer you can see the effect of your actions: 
If you reckon the effect is too strong, you can always add some Gaussian blur. 

Quick guideline to adding Gaussian blur: 
1. Open the gray layer and use the lasso tool to select the part of the picture where you think the effect is too strong
2. Go to Filter > Blur > Gaussian blur
By moving the slider to the left you'll dampen the effect in your picture, so it's less visible. 

Another option is to wait until you're all done with dodge and burn and then change the opacity of the layer where you think the effect is too strong. 

I used this picture of Bas Diederen for this tutorial. I have to admit, I also used another technique here: using channels. Rest assured: I'll write more about that next time. 

So I used dodge and burn as described in this post and I desaturated the background to have more focus on the triathlete. I reckon that with dodge and burn, the attention is much more on his muscle structure and it makes him look as strong as he actually is in the picture. 

Before and after: 


Don't forget to follow us on Facebook or 500px. And have you already discovered our brand new Facebook page Humans of the Nordic Region!


Monday, November 2, 2015

Dodge and burn, part 1 // Using Curves adjustment layers.

Before I start telling about the how, let me just clarify why this technique is called "Dodge and Burn".
Dodging and burning are terms used in photography for a technique used during the printing process to manipulate theexposure of a selected area(s) on a photographic print, deviating from the rest of the image's exposure. In a darkroom print from a film negative, dodging decreases the exposure for areas of the print that the photographer wishes to be lighter, while burning increases the exposure to areas of the print that should be darker.[1]

So in short: 
Dodging is lightening making the lighter parts lighter, burning is making the darker parts darker

And you know what? It's actually quite simple, once you know it. 

One of the methods that can be used is the Curves adjustment layer.

1. Open the picture

2. Add a Curve Adjustment layer

3. Lighten the picture 

4. Invert the mask using CMD or CTLR I (so it's black now)

Mind you, the effect is not visible now, because I used a black mask. Remember, white reveals, black conceals. Rename the layer to Dodge.  

5. Add a new Curves adjustment layer. 

6. Make the picture darker  

7. Invert the layer mask to black and rename it to Burn. Now I have 2 black layers that are called Dodge and Burn 

8. Next I used a white brush with a soft edge. I set the Opacity and flow very low (round 25%) 

I used the brush to paint the part of the Dodge layer mask that I wanted to become lighter. 

9. Select the Burn layer mask and repeat the process, except that now I painted that part that I wanted to be darker. 

Although the result is very subtile (as it should be, in my opinion), you can easily see the effect by turning the layers on and off. 

And this is my end result: 


Don't forget to follow us on Facebook or 500px. And have you already discovered our brand new Facebook page Humans of the Nordic Region?