Tuesday, January 31, 2017

Lightroom Quicktip, create an import preset

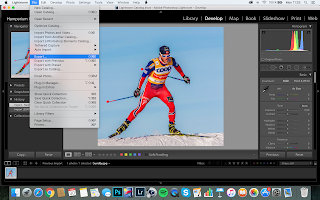
You can save your import in Lightroom as a preset


Fill in the location, keywords etc....  Now we gonna save it as a preset.  You can find this option on the bottom of the screen.


Give it a name and you are done. So the next time you can use this preset to import your pictures


Don't forget to follow us on Facebook or 500px.


And have you already discovered our Facebook page Humans of the Nordic Region?


picture from Pixabay.com


Monday, January 30, 2017

Photoshop Quicktip, add a vignette using a gradient

To add a vignette we can also use a gradient.

1. Open your picture 


2. Add a new empty layer and select the gradient tool (G)

Use the white to black Radial Gradient and drag a layer form the center to the outside. Probably you must to it a couple of times to get it on the right position.


3. Change the layer Blending mode to Overlay or Soft light.
4. Reduce the layers Opacity.


For this image we reduced the opacity to 35%


Don't forget to follow us on Facebook or 500px


And have you already discovered our Facebook page Humans of the Nordic Region?
    picture from pixabay

Other kind of Double exposure in Photoshop

In this blog we describe another way of making a Double exposure in Photoshop.

Open a picture, best is a solid back ground.  Move another picture of the same person to this picture.


Now we get two layers.

Select the top layer and double click on the right site of the layer to open the layer style menu.


By turning on the different channels you can create something like this


I like it the most when the red channel is of. If you choose your colors click on Ok to close the layer style screen.
Now move the top layer to the left.  Make sure before you do this that have space their.


You can see the top layer needs more space at the left side.    Turn of the bottom layer and make a selection with the Rectangular Marquee Tool


Use free transform to stretch it to the left (Cmd or Ctrl T).


Now turn on the bottom layer to see the Double Exposure


From this point you can edit it more the way you like it.


Don't forget to follow us on Facebook or 500px.

And have you already discovered our Facebook page Humans of the Nordic Region?


picture from Pixabay.com


Cutting Out Hair in Photoshop

One of the things people struggle with in Photoshop is with selection hair.


There are as always many ways to do it. For example using channels but this time we will try to do the job using the Background Eraser tool. This works well for a background that is contiguous.


Set your settings to this. 


The tolerance is depending on your image so try and see what works best.  Click on the hair to set 'the protect Foreground colour'.


Now we can paint over the background to erase it.
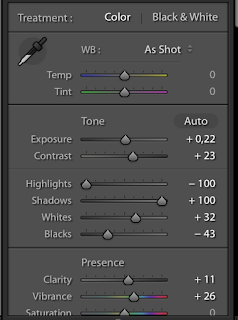


Just try it out and if you done it you can easily change the background.


Don't forget to follow us on Facebook or 500px.


And have you already discovered our Facebook page Humans of the Nordic Region?


picture from Pixabay.com

Create a Stencil Effect in Photoshop

Create a Stencil Effect in Photoshop.

Open an image and duplicate the background (Cmd or Ctrl J)

Go to Image > Adjustment > Posterize.  and choose a level that fits with your image

Go to Image > Adjustment > Treshold. and choose a level that fits with your image or the effect you want to create.

Now the stencil effect is created. If you want you can remove part that not belongs to the horses. You can do that with a hard edged brush.


Don't forget to follow us on Facebook or 500px


And have you already discovered our Facebook page Humans of the Nordic Region?
picture from pixabay.com

Easy way to change eye color in Photoshop

Here is a easy way to change someones eye color.

Open an image

Add a new empy layer and change the blending mode to overlay.

Now grap a soft brush and choose a color and paint over the eyes

Use the eraser if you paint over the lines of her eyes.  Use the Opacity slider to make it more or less blueish.

With hue and saturation (Image > Adjustment) you can now easily change the color.


Easy and quick.

Don't forget to follow us on Facebook or 500px


And have you already discovered our Facebook page Humans of the Nordic Region?
    picture from pixabay

Lightroom Quicktip, Make a preset for your export

In Lightroom you have a possibility to make a preset of your export. So after you have done the editing you are ready to export the pictures.

So choose export  


Fill in the location, name etc.


Now click on the ' add'  in the preset menu on the left side to the screen.

Fill in a name and save it


Now you can use this preset for other times you want to export with this settings.


Don't forget to follow us on Facebook or 500px.

And have you already discovered our Facebook page Humans of the Nordic Region?


picture from Pixabay.com


Lightroom Quicktip: Turn the spotlight on

We start with this picture


If you want the attention on the man in the middle, you just have to turn a spot on him.

In Lightroom its easy using the radial filter


Invert the mask, feather it and increase the exposure and the spot is on.

Easy and simple


Don't forget to follow us on Facebook or 500px.

And have you already discovered our Facebook page Humans of the Nordic Region?


picture from Pixabay.com


Sunday, January 29, 2017

Selective color in Lightroom

Selective color is maybe a not done but sometimes it gives a nice effect. So why not? One way to do it is using a Black and white adjustment layer in Photoshop and using the mask. But we can also do it in Lightroom.

Start with opening your image in Lightroom

Do your regular workflow

Then we go to HSL Panel in Photoshop.  Here we remove all colors except the reds and oranges. But that depends on your image.

In the picture we see the truck is very red but there is some color in the background. We can remove this with the brush. So grap a brush and desaturate the background (flow and density of the brush 100%)

The red color is the mask and that are the areas I changed into black and white.

The end result


Don't forget to follow us on Facebook or 500px.

And have you already discovered our Facebook page Humans of the Nordic Region?


picture from Pixabay.com


Friday, January 27, 2017

Photoshop Quicktip, protect your images

If you send your work to client and you don't want that the can edit it or print it, before the have paid, here is a solution.

Save your image as a .PDF and secure it with a password.

Go to File > Save and choose Photoshop PDF and hit the 'Save' button.


Then go the security. Here you can choose for the option to add a password.  So hit the checkbox, add the password and click on 'Save PDF' 

Don't forget to follow us on Facebook or 500px.

And have you already discovered our Facebook page Humans of the Nordic Region?


Wednesday, January 25, 2017

Photoshop Quicktip, Get the Refine Edge Dialoge back

Photoshop is now working with the Select and Mask Dialogue. But some prefer the old Refine Edge Dialoge.

Here is how to get is back

Open an image and make a selection.


Press and hold the SHIFT key and go the menu and click on Select >  Select and Mask


And now the old Refine Edge is back.  


Easy and simple. 

Don't forget to follow us on Facebook or 500px.

And have you already discovered our Facebook page Humans of the Nordic Region?