Thursday, March 17, 2016

Handy tip! Searching an image in Lightroom

Thousands of images that have been processed in Lightroom and then you're looking for just this one particular picture. Does this sound familiar? This post is about quickly finding an image in Lightroom. 

Searching in Lightroom is based on the metadata you entered during the import of your images.

Open the Library module in Lightroom to start your search. 

The first thing to do is to tell Lightroom where to search. You can search for example in a specific folder or collection. Or you can search in All photos

When searching in Lightroom, you'll need the Library filter bar, which is normally at the top of the Library module. Mind you, you'll only see the filter bar when you are in grid view.

When you don't see the Library filter bar go to View > Show filter Bar

There are loads of searchable items: 

1. Text

2. Attribute

3. Metadata

Now enter a keyword and then search. I used Trondheim as keyword for this example. 

Next I wanted to find all the 4 stars pictures of Trondheim with a yellow label. I went back to the Library filter bar to make a new selection

There you have it: loads of options to find your image. Just tell Photoshop where to search and enter the selection criteria in the Library filter.

Do bear in mind that when you start searching for another image in Lightroom, it'll remember the criteria from your latest search.  

Don't forget to follow us on Facebook or 500px


And have you already discovered our Facebook page Humans of the Nordic Region?

Wednesday, March 16, 2016

Let there be light! Creating light rays in Photoshop

A post about creating sun rays in Photoshop. There are many different ways to do this, but this is my favourite method: 

Yep, it starts with opening an image:

  1. Add a new empty layer
  2. Choose brush and sample a color from the sun (using the Alt key)
  3. Change the brush (Windows-brush),

    spacing: around 120 % shape dynamics: size jitter 100%
    minimal diameter: 0%

    scattering: put on Both axes
    scatter around 1000%
  4. Paint dots on your screen and make them smaller and bigger, mostly round and close to the sun
  5. Now add a Radial blur: zoom and choose center point (where the sun is on your image) see what works best for your picture:
  6. Change the blend mode to soft light or color dodge
  7. Change the opacity of the layer, to make the rays more or less visible.
With Free transform (Cmd T) you can change the position and size of the light rays.

And voila: the end result:

Don't forget to follow us on Facebook or 500px


And have you already discovered our Facebook page Humans of the Nordic Region?

    picture from pixabay

Monday, March 14, 2016

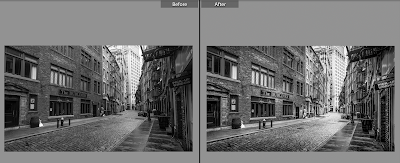
Dodge and burn in Lightroom

I usually shoot in RAW. That gives me lots of freedom in post processing. I want my image to tell a story, I want the viewer to be led into the picture. 

When editing in Lightroom you can use the brush, radial filter and the graduated filter to dodge and burn and make your images even more interesting.

I downloaded this image from Pixabay. 

First step is converting it to black and white

Then i followed my usual workflow:
- boost the contrast
- bring down the highlights
- increase the shadows
- black and whites
- and in this case I added some overall clarity

Then I added some radial filters (100% feathered) to give some parts of the image more attention.

With the brush I lightened the road a little to make it a stronger leading line.  

Then I closed the picture with a graduated filter at the top and the bottom

To see what you have done you can press Y to see the before and after

The dodging and burning gives the picture more depth and leads the viewer through the picture

So have a go. Don't be afraid to experiment. 

And: don't forget to follow us on Facebook or 500px. Have you already discovered our Facebook page Humans of the Nordic Region?


Friday, March 11, 2016

Creating smoke using the Xplosion brush set

In a previous post, I described how to add smoke to a picture using the Clouds from the filter menu. There is another way of adding smoke. I've downloaded these free brushes (download here) and will show you how to use them: 

Obviously, you'll first need to download the brushes. Then load the brushes into Photoshop. 

Now you'll find your brushes in your brush panel

I picked up a brush and changed the brush settings:

Shape dynamics:
- size jitter round 70%
- angle jitter round 100%

Transfer:
- opacity jitter around 70%

Now paint with white, on a new empty layer, where you want the smoke (make your brush bigger or smaller depending on the effect you're after).

Mask it out where you don't want smoke and reduce the opacity of the layer. You can combine it with the smoke from the clouds technique I described in the previous blogspot.


Don't forget to follow us on Facebook or 500px


And have you already discovered our Facebook page Humans of the Nordic Region?

    picture from pixabay

Wednesday, March 9, 2016

Smoking permitted! Creating smoke with Photoshop

Sometimes it's a bit of smoke that's lacking in an image. A bit of smoke to give it just the right atmosphere. In Photoshop it's real easy to create smoke. 

Let me start with using clouds which can be found in the Filter menu. I start with this picture and I'm adding a new empty layer.

Then go to Filter > Render > Clouds (NB: make sure your foreground and backcolor is B&W)

The screen now looks like this: 

I know, this is not the effect I'm after, so I'm gonna use just a little bit of these clouds. Grab the marquee tool, select a small area and copy it is as a layer: 

So now we end up with 3 layers. Disable the clouds layer. Select the top layer (the selection of the clouds) and hit Cmd T (Free Transform). Drag the corners, holding your Shift and Option key, so the entire screen is covered.

Now change the blending mode of the layer to Overlay or Soft light. I went with soft light to get my desired effect:

If however you desire more smoke, you can easily copy the layer and move it. Then you'll get someting like this

It's easy to remove smoke from parts of the picture where you don't like it, using layers masks:

Instead of using more layer masks for each Smoke layer, you can group the smoke layers and use a layers mask on the entire group:

Last thing for this blog is that there is another way to get a nice smoke effect. 

Instead of changing the blending mode of the smoke layer to Soft light, you can use Normal and reduce the Opacitiy of the layer. Then mask out parts where you don't want to have smoke: 

Get to it, experiment and find out what works best for you. 

Don't forget to follow us on Facebook or 500px

And have you already discovered our Facebook page Humans of the Nordic Region?


Wednesday, March 2, 2016

Part 2 - going short in Photoshop

In the previous blog I wrote about Photoshop short cuts and how you can find your actual set of short cuts in Photoshop.

But Photoshop doesn't actually have short cuts for all your actions. Don't worry, you can easily make them yourself. How? Read on.... 

Go to your short cuts in the edit menu:

I bet you have some Photoshop actions you use all the time. If you ask me, it would be adding a Gaussion blur, sharpening a picture or adding a layer mask to your layer. For all those actions, you'll find no short cut so let's make some now. 

I'll use the Sharpen more function as example. Search for it in the menu on the left side (or the screen) and select it:
Now you can choose a (logical) short cut. I went with Cmd J. But this one is already in use so I got a warning:
You can either accept or decline the warning. In this case it's not a good idea to accept it so I tried another combination
This combination doesn't give a conflict so I went with it.

In the overview you can find your change.

I also created a short cut for Adding a mask to a layer.

Easy right? I advise you to make short cuts for your frequently used actions in Photoshop. It saves you loads of time! 


Don't forget to follow us on Facebook or 500px


And have you already discovered our brand new Facebook page Humans of the Nordic Region?