Showing posts with label contrast. Show all posts

Tuesday, April 11, 2017

Improve your Photoshop skills

Watching Youtube movies is still one of the best thing to improve Photoshop skills.  But the best way is to do it yourself.

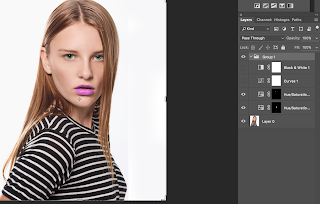
I started with this picture

I wanted to change the colors of her lips and the colors of her eyes.  And i wanted to have the possibility to change the colors anytime during the project.

First i changed the colors of her lips using a Hue and Saturation Adjustment layer.  I changed the colors and made the mask black.  I painted with white over her lips to make them purple.

Then I added a second Hue and saturation Adjustment Layer to change the colors of her eyes.

At least I added a Curve and a Black and White Adjustment Layer.  (For more contrast)

Oher things you can do is to change the background color but this time I didn't do that.  I made a stamp visible Layer and move the first and last layer to a new document. With those two layers I made an Animated Gif to see the Before and After.

If you want be better with Photoshop the only thing to do is practise, practise and practise. Youtube has tons of movies to help you. Have fun.

Don't forget to follow us on Facebook or 500px.

And have you already discovered our Facebook page Humans of the Nordic Region?


picture from Pixabay.com

Thursday, March 16, 2017

Photoshop Quicktip, Add contrast using the Levels Adjustment Layer.

A way to add contrast in your image is to use the Levels Adjustment Layer.

Open your image in Photoshop.


Now we gonna add add a Levels Adjustment Layer.


By moving the dark to the right and the light to the left in the upper slider you give the image more contrast.


The second slider decreases the contrast in your image.

Its works very fast and easy so try it out.


Don't forget to follow us on Facebook or 500px.


And have you already discovered our Facebook page Humans of the Nordic Region?


picture from pixabay

Monday, December 19, 2016

Photoshop Quicktip: More contrast using the Overlay Blending mode.

One of the important thing is that a picture needs contrast. In photoshop are there many ways to add contrast to your image.  Of the ways to to this is by adding a new Adjustment Layer and set the blending mode to Overlay.

Lets show this by opening this image, from Pixabay.


Now duplicate the layer by using Cmd or Ctrl J and set the blending mode on Overlay


To control the effect you can add a layers mask and reduce the Opacity of the layer.


Don't forget to follow us on Facebook or 500px.


And have you already discovered our Facebook page Humans of the Nordic Region?